Sunday, June 28, 2015

Barrel Oven - Planning

I've already written a bit about my enthusiasm for ensuring we have something other than a camp stove and an open fire to cook on during the build of our house. I've done that before for large groups of people and I'm not keen to repeat the experience over longer than a weekend. It also seems fairly obvious that the key to ensuring we have willing and happy helpers is to keep them well fed (the whole build will go smoother with full bellies). So I don't think it's unreasonable to spend quite a bit of time and effort ensuring this is taken care of - I consider it good project management.

One of our strategies is a barrel oven:


I've seen a number of accounts on various blogs from people who've built their own ovens, including making the metal parts themselves, but they're all a bit light on detail about how they did the metal bits. Others simply purchased the metal parts from Firespeaking and just built the oven around them. Since the latter isn't an option for us (even if Firespeaking shipped to Australia I think the postage on something as heavy as this would be beyond what we'd consider worth it) we'll build the whole thing ourselves from scratch and keep an account of it here for anyone else who wants to do the same.

In the planning stages there are some fairly obvious requirements, and the rest we'll make up as we go along.

The pieces we'll need to make out of metal before we begin building the oven are:
  • Ash grate
  • Ash drawer
  • Firebox door
  • Barrel with slots for drawers
  • Barrel door
  • Shelves
  • Chimney with baffle
We're fairly sure we'll need the following equipment:
  • Welder
  • Angle grinder
  • Metal file
  • Measuring tape
  • Spirit level
  • Hammer
We already have all of these, most of them purchased with this project in mind but knowing they'll be useful for others down the track. We don't yet have safety equipment for the welder though, so we'll need to get two sets of welding masks and gloves and leather aprons and so on before we can start.

And the following supplies:
  • Lengths of angle iron (x many)
  • Steel rebar
  • Clean 55 gallon drum
  • Thin (ish) steel sheets
  • Various scrap strips of steel (handles etc)
  • Hinges (both for firebox door and oven door)
  • Ceramic fibre insulation
  • 6" diameter metal pipe (chimney)
  • Bricks
  • Mortar
  • Gravel (under foundation)
  • Cement (unless we find a better foundation)
  • Wood offcuts (for arch moulds)
  • Large nails (for rivets)
Most of these bits and pieces are likely to be sourced from the local tip, and I'll keep track of how much it all costs us. We'll start with the ash grate as that is likely to be easiest (plus we have the bits for it already).

Sunday, June 7, 2015

Very rough plans for a little house

The inspiration for our current plans are largely based on a design by Owen Geiger at the Natural Building Blog. I don't know if anyone has ever built this house design (whilst plans are available from the site, it's not clear how many people have purchased each one let alone built it).


I ditched the curve fairly early on, for simplicity's sake, though it means putting in buttresses to support the walls. This was helpful initially doing drawings and sketches, but more recently I've wanted to add them back in again. At first I diverted quite a long way away from the original layout, and found myself coming back to it with each drawing. Eventually, the only addition was lofts.

Currently these plans have been done just by me in SketchUp. Ultimately we'll need to involve an architect, or a structural engineer at the very least. But we want to have a very clear idea of what we're asking for before we do, as it's unlikely we'll find people who have experience with this kind of building. Given the overall project it's also important that either Kyle or I (or both if possible) have a pretty solid understanding of the whole thing and each of the features we want to use so that we can take advantage of recycled materials we find, and if something doesn't happen as planned during the build we can improvise effectively.


I'm not really convinced by the split levels in the roof. I did it that way at first, so we could have a loft on one side, but in hindsight I think it'll be easier to have the whole roof at the same level and have lofts on both sides. The split is likely to be a weak point for leaks, and difficult to put together. Then you need fancy bits for guttering, and the higher the roof the less restricted you are in terms of water flow into tanks given the loss of vertical height in leaf traps and first-flush diverters.


There are a lot of details still to iron out. I'd like it to be a bit smaller overall, but we'll have to work on the layout a little and work out how attached we are to our current furniture. For example, we have a big purple couch at the moment. We love it dearly, chose it very carefully, and use it thoroughly. But, we could have a couch that is also a rocket mass heater. Having such a large object fulfil multiple functions makes good sense in a small house. In-built furniture has other benefits, you can work ventilation around it more easily, it can be structural support for something, and you don't have to worry about the fabric fading in the sunlight (not that I did anyway, clearly I make a poor homemaker).

So it will be a little while before our development application gets made, but we have a start. Aside from the house plans there are other plans, like the composting toilet application and solid fuel heater application if we do decide to put in a rocket mass heater (seems a no-brainer to me).

Wednesday, May 20, 2015

Free stuff!

The perks of telling everyone you're building your house yourself and using as much recycled material as possible is that occasionally you get free stuff!


And this was just the first van-load of the day. We're rapidly running out of space to put building materials, and the first thing we'll do when after settlement on our new block of land is arrange some temporary storage that's reasonably weather proof for the vast array of timber, metal, tiles, and other random useful things we've collected.

Sunday, April 26, 2015

I spy a solar oven, an ash grate, and the walls of a house!

Kyle and I visit the local tip almost every weekend, and have done for over a year now. Our latest finds, pictured below, were purchased this morning for a grand total of $40.


The slightly rusty but very sturdy white box is going to get de-rusted, repainted, decorated internally with insulation and al-foil and become a solar oven.

The rolls of barbed wire will begin our collection for building either our house or water tanks or any number or random other things with earthbags. We've avoided barbed wire until now as we were sure we'd need special galvanised stuff or something, but this was just too perfect to pass up so we figure after this we'll just pick up any other bits of barbed wire we find - there's heaps of it around for cheaps.

The rusty looking bedframe thing is just welded together angle iron, so along with the rebar will be ripped apart with an angle grinder and hacksaw, then welded together form the ash grate for our soon-to-be barrel oven. Kyle's going to slowly put the pieces for the barrel oven together over the next month or two as it will likely be one of the first things we build on site after settlement on the land itself. We bought a mig welder about a month ago on GumTree for $100, so we're all set!

The random piece of some kind of hardwood will be added to Kyle's extensive timber collection. We think that to buy the equivalent to Kyle's collection new would cost several thousand dollars at least, but we've spent maybe $300 on it over the last two years.

The really odd find was the yellow fluttering-looking things on top of the box. These are flags, made of wire stakes and light high-vis plastic. We know we'll need something along these lines for marking out either buildings themselves or, later on, contours on the land for swales and dams to control water flow down the hill. These ones were a bit wet, so the flags were all stuck together, but there were about 30 of them and since we know we'll need something like this eventually we might as well grab them now. One less thing to buy later on.

Not bad for $40! Buying building materials this way does tend to make budgeting a challenge, though.

Thursday, April 9, 2015

First meeting with the Council

Even though we haven't yet bought the land, we're pretty sure by now that we'll end up in Palerang Council in NSW, to the west of Canberra where we currently live.
We have a bunch of friends who own property a bit outside of Braidwood, and we've been going there for various camping events with the historical re-enactment community for quite a few  years.

Palerang Council offers optional pre-approval meetings for people intending to lodge development applications to meet with a town planner to discuss their intentions in the early stages. This is intended to make the eventual application process smoother for both parties. We asked them "how early is too early" and mentioned we hadn't actually bought the property yet, and they said "how's thursday?" so we went along to meet with them this morning to discuss our very rough plans and see what they thought.

This was a very nervous moment for us, having heard any number of horror stories about approving authorities from others. We were very aware the Council could potentially put so many barriers in the way that our project is completely derailed before it begins. This is exactly the reason we were keen to seek a pre-approval meeting before we buy the block of land we've found - we wanted to sound them out before we're committed.

Prior to the meeting we were reasonably sure we would be this council's first experience with earthbag building as a primary residence, though we have to assume they've dealt with other more common styles of natural building such as straw bales. There was always the possibility we might have to change strategies and explore these styles if they turned us down for earthbags. We don't take a lot of pleasure being the first (I get the feeling a lot of EarthShip builders quite enjoy that), it just means we have more explaining to do.

So we toddled along, not sure what to expect but armed with a SketchUp model of our intended house, a book on EarthBag building with lots of pictures to explain what we wanted to do, and an extensive list of questions to ask.

As an initial discussion our experience was overwhelmingly positive. The person we spoke to was open minded, and had even looked up earthbag building before we got there so he had some idea of what we were talking about. The general outcome of the conversation was that as long as we can convince an engineer to sign off on our plans we'll be good to go so far as the council is concerned, though they did confirm our suspicion we would be their first experience with it. The same goes for building water tanks out of earthbags.

So the structure was straight forward, but our ideas on DIY composting toilets and greywater reuse were (understandably) met with somewhat less enthusiasm. We will need to cross our t's and dot our i's with that one, and probably have some extensive discussions with NSW Health. Apparently over the last few years they have been discouraging people to consider greywater recycling because of the health implications (one would think the health implications of running out of water would be more significant, but there you go). The advice on this aspect was to keep the conversation with the council open as we progress - they can give us an idea of yes or no before we get to the final application, which will make the eventual process much smoother. As this was essentially the philosophy we went into the initial meeting with we think it will work well for everyone, and hopefully be relatively painless.

It seems we are off to a good start, however, and armed with the goodwill of the council (or at least not the ill will) we'll start the process of buying the land and getting all our paperwork sorted for a final Development Application!

Monday, April 6, 2015

Toilet Standards

I mentioned previously I'd tracked down a copy of the Australian Standard for Waterless Composting Toilets at the National Library. AS/NZS 1546.2 was most recently updated in 2008.

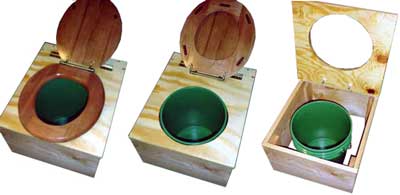
The initial goal was to build a Jenkins-style lovable loo,

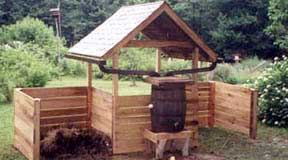
With an associated humanure hacienda.


Because simple is usually best. So, how does this fit with the standards against which we must adhere?

Well, firstly the AS/NZS 1546.2 only seems to apply to manufacturers of waterless composting toilets, not mere mortals wanting to build their own for personal use. Also, upon re-reading the Plumbing Code of Australia the part that refers to WCTs needing to comply with this standard doesn't apply in NSW, where local governments have jurisdiction anyway. One wonders at the point of having a national code at all. This is good, because whilst overall the spirit of the standard implies that the Jenkins model is in keeping with the intentions of the standard, there are a few specific points in the standard to do with limiting possible human contact with the pile that would come down to how people use the system rather than design features.

I'm not sure now exactly which standards we'll be assessed against when we go for approval with the council - potentially only their risk assessment about not contaminating water sources, which I think we have in the bag. We're going to see the Council in a few days for our voluntary pre-development-approval meeting so I will add this to my (rather extensive) list of things to ask them.

Thursday, April 2, 2015

Composting Toilets

A little while back I bought Joseph Jenkins 'Humanure Handbook' to help answer the question of whether to opt for a waterless composting toilet or not.


Almost everyone I found who'd written about reading this one highly recommended it, including me, however it's probably fair to say the audience is likely to be fairly self-selecting.

After reading the book, and checking against various other sources I found about the place, both Kyle and I are pretty convinced that it's a good idea from both a water-conservation and a matter-conservation/soil health perspective. The biggest unknown for us is what it will take to get approval, given that we really have no intention of spending lots of money on a commercial model when we could make one ourselves and have greater control over its function. I know of several other households in NSW who have used composting toilets of the style Jenkins describes, but don't know what they went through to get approval (if they bothered).

So, naturally, I went looking for the rules. The National Construction Code V3 Plumbing Code of Australia (in Section F, Part 1, On-site Wastewater Management Systems) states "The size determination, design and installation of waterless composting toilets must be in accordance with AS/NZS 1546.2". Standard 1546.2 can be purchased from Standards Australia for a little over $200. Considering that construction of a Jenkins-style loveable loo is likely to cost us quite a bit less than $200 we have no intention of purchasing a copy of the standard (which would probably eventually end up making its own deposit in said loo anyway once we were done with it). I've tracked down a copy at the National Library of Australia (conveniently just down the road), which I'll take a look at in a few days.

NSW Health has approval guidelines for waterless composting toilets though it's unclear what relationship they bear to Standard 1546. They predate the Standard by several years so one can only assume they have been superseded by it. The NSW Health rules seem rather restricting of DIY solutions, which is less than encouraging, but they do provide construction guidelines.

The NSW Local Government Act 1993, section 68, puts approval for Onsite Systems of Sewerage Management (OSSMs) firmly in the hands of the local council but doesn't go into any detail about the standards against which approval may be granted. Palerang Council, within which we will likely reside, has information sheets available on the approval process for an OSSM, with a good one detailing the risk factors they check during the inspection stage prior to approval. Palerang's factsheets are quite general, not nearly detailed enough to provide construction guidelines, so we will definitely need to at least skim read the standards.