Tuesday, May 24, 2016

Soap!

Given that our house won't be connected to any grid services, and we won't have a septic tank (and also we're not completely silly) we'll end up with a greywater system feeding into the garden. This raised questions for us about sodium build-up in the soil over time from soaps, to which the obvious solution seems to be potassium-based soaps instead.

(long story short, soap is made by combining a strong base with oils or fats, usually sodium hydroxide is used as the base but alternatively potassium hydroxide can be used and the potassium is friendlier to plants than the sodium).

After a bit of a search it seems it is possible to buy potassium soaps in Australia but they're either quite pricey or have loads of perfumes in them (which sets off Kyle's asthma). Ordering from overseas is again possible, but postage adds up.

Now, one of my majors at Uni was chemistry, and I spent 5 years as a science teacher. So I'm not particularly worried by the thought of making it all myself. But it was pretty easy.

I started with the Castille soap recipe here, with the aid of more detailed instructions here.


It doesn't look very exciting yet.

The soap paste turned out a little more fluid than I thought it would, but I suspect that's because my attempt at making distilled water in my kitchen resulted in nothing but burns and swearing so I had to use filtered water instead, which is not as good. I'm going to try and source some proper glassware for next time (lots of high schools don't do distillation anymore but have heaps of the kits and occasionally get rid of them).

I'll experiment with different dilution, maybe some colours and essential oils, and then a few different liquid soap recipes. I've also seen recipes that claim success in making a hard potassium based soap by using animal fats (as is traditional for sodium based soap), but accounts vary so I think I'll experiment when I have more time (and easy access to animal fat).

Saturday, May 14, 2016

The power of the wind

We turned up at the site today to find that the site shed (a good 12m long, weighing in at somewhere around 3t) had shifted about half a meter at one end, and toppled off it's concrete blocks.


After much discussion, Dad and I spent about half a day very carefully jacking up the structure again and removing the blocks before re-stacking them. We cut out the soil underneath to tilt the blocks inwards, and Kyle shaped a block of hardwood to fit in the triangular gap to provide a flat surface for the joists to sit on, and a little shelf cut out so it couldn't shift side to side.


What we think happened is that in the strong gusting winds the end of the shed had shifted, milimeters at a time, and eventually ended up on the edge of the previous stack which caused it to topple over and move the whole thing such a substantial amount. We're hoping that the angle of the blocks here prevents that incremental movement in future so it can't get to the point of toppling again.

But, to be sure, we dug a hole about 45cm deep and used some leftover concrete we're glad we had lying around to sink half a sleeper right up against one of the main struts. Currently we only have one, as it was an awkward hole to dig (half under the structure) and so took us a long time. The aim was to get the building to a point that was stable and safe first, before ensuring it stayed that way longer term.


We're going to add another couple of these posts (we've got loads of sleepers leftover) until we have a few on each side, though the prevailing wind is strongly from the northwest so this first post went on the northeast end (the end that shifted).

The other possibility that occurred to us was that the building could roll. The wind is very strong, and it's close to side-on (we wanted a cross breeze in summer). We're not really sure how much of a risk this is, and have no way of knowing. My assumption is that the shed is bottom heavy (there are two very large steel girders, with substantial steel joists across, that make the base of the structure, whereas the wall joists are smaller and I think aluminium). However, while the chance of it tipping may be low the consequences if it did so would be catastrophic - I doubt the structure would survive, nor potentially would we if we were inside at the time. We'd certainly have no way of righting it again ourselves.

A few suggestions were made, everything from angle iron braces on either side, and guy wires. Eventually our favourite suggestion so far came up - webbing and ratchets (substantial ones) attached to hooks concreted into the ground on either side, strapped over the whole structure at solid points. We're still figuring out the details that will make it work, and may yet do something different. We have most of the stuff for this strategy already, and it would be fairly quick to implement, whereas any other way would require us to go buy a bunch of materials.

For the moment, crisis averted. But we'll watch this space very carefully for signs of movement.

Thursday, May 5, 2016

Let there be light!

My Dad kindly offered to design and put together a custom solar electrical system for us. Always nice to have bored retired engineers floating around when you need them. He was planning on replacing the solar panels on the roof of his camper van anyway (upgrading to make better use of the space) and we got the (still perfectly functional) old ones.

Batteries arrived a few days after Dad did, having been off to the coast for a few weeks. Lithium, 8 cells in total to achieve 24V.


He had a friend help him switch them on the roof of the camper van, as he had some better equipment than we did. They also welded up some frames for us for the old panels.

The framing is designed to be as simple as possible, able to stand up to strong winds, and potentially mobile in case we ever want to shift the panels closer to the eventual main house. There are 4 uprights of heavy angle iron (50mm) pounded into the ground at the corners. Then a rectangular frame of lighter angle iron (25mm) to hold the panels. Finally, two pieces at the southern corners to raise the frame at an angle.


We had to add an extra upright in the middle of the wider section of panels, as they sagged a bit which bowed the frame and made it prone to swaying in the wind. An extra piece of angle iron and a bolt fixed that.

The angled pieces on the southern end are fixed with bolts and wingnuts, and though they're current set to a steep angle as it's coming in to winter there's another hole drilled in the right spot for a shallower summer angle. The extra effort involved in changing the panel angle twice a year is well worth the gain in power.

Dad keeps joking that we'll have to stage some kind of ceremony twice a year on the equinox to change the angle of the panels. I'm not sure what the appropriate attire would be for blending science and druids - I have mental images of a group of people in long flowing lab coats chanting Monty Python songs while switching the bolts.


Dad spent a few hours testing the wiring in the site shed, which we were surprised to find seemed to check out.

Kyle and I spent two days building a weather proof box to house the batteries, inverter, and so on. A wooden frame, with cross pieces positioned in specific places to allow for attachment of various parts.


Then galv sheets over the outside to clad, and a corrugated iron roof. We made one side out of leftover perspex we had lying around, as one of the parts inside the box has a display to do with battery cell balancing. I thought about doing a window, but the whole side was just easier.

Dad spent the next week while we were at work setting up all the parts and cabling. At some stage I'll get him to do a post about why he picked each particular part, and how it all went together. It'll be like an entire thesis, I'm sure. He keeps talking about first principles of battery charging, but the system he's designed is a highly customised set-and-forget. Either way, he wired up everything into our box nicely.


Then, we turned up the next weekend, and most of the wiring in the site shed just worked!


We have a dozen or so power points, several internal lights, and an external light. Over the coming few years the idea is to expand the system as needs arise, but currently we have panels that add up to about 600W, batteries at Ah, and a 3kW inverter. That translates to enough power to run most things we need for day to day living, though there's not so much extra that we won't have to watch it a bit.

After all of this was hooked up Dad and I ran cabling into the building for an inverter on/off switch and a battery level gauge, but I forgot to take photographs of that part. Which is a shame, as passing the cabling up through the walls required some amusing gymnastics. I'll take a photo next time I'm out there as we have a few bits to add to it yet.

Wednesday, May 4, 2016

Site Shed

Time pressure on self-builds is a funny thing. It makes everyone mad and stressed. Most people try and make it go away by having a temporary house while they build the main one, to avoid paying rent and building at the same time. Often a caravan, or garage that's been converted, that kind of thing.

We'd had it in the back of our heads for a while, even tracked down a mining company that was selling off a bunch of temporary accommodation blocks a few months back, but we had trouble finding something with more than one window that was within a reasonable distance. Then we found this on GumTree:


It needed a fair bit of fixing up, but was very cheap, so we figured we didn't mind. Getting it to the site was a whole day, then it took us three weekends worth of work to get it completely weather proof. One day of silicone and caulking guns on the outer walls, about half a day for Kyle on the roof (we went over all the screws as the seals had perished, and up under the edge of the rim just in case).u

There were 3 big rectangular holes in the wall, one in each of the 3 rooms, that had had air conditioners in them. Kyle tidied them up a bit, then screwed a sheet of perspex over two of them. We sealed up the outside, then Kyle plastered up the edges and put frames around them to make them look like windows.


The third one, though, still had the metal frame that had held the air conditioner itself. We decided to leave that in, and make a little hidey hole for our cats with it. I cut away the vent screens with an angle grinder, and gave the whole thing a good clean. Kyle put perspex over each of the gaps and sealed it up with silicone.


I'm going to make a full height scratching post for our two cats to climb up to get to their sunroom. But first, we had to make the rest of the place liveable.

Pulling up the old vinyl flooring took a lot longer than I thought it would, and it was a hard job. The old vinyl was very brittle, so you couldn't just get a big patch then pull, it came off in tiny little pieces more often than not. Eventually my Dad had the bright idea of hooking Mum's hair dryer to a long extension cable plugged into their camper van, which softened the glue enough to help.

At this stage, the walls are sealed (inside and out), the old floor is out, we've bought new flooring, and will likely put it in sometime in the next week or two. We did spend the night in the end room one weekend, and it was bitterly cold, so we're exploring our options for adding to the ceiling insulation, and I'm going to make some thermal curtains for all the windows. We'll look into diesel heaters as well. Given this is a temporary home we don't want to spend too much time on it - we'll get it comfortable, but our focus is still on the main house.

Monday, February 8, 2016

Birdwatching

My Dad is a very keen birdwatcher. By very keen, I mean that he has well over 5000 pictures of birds that he's taken and loaded onto his computer, and has been known to abandon cups of tea, chocolate biscuits, even entire bowls of dessert in order to leap for his camera and capture some rare feathered example. There was one moment, building the outdoor kitchen block, in which he almost made a leap from the top of a ladder because he forgot he couldn't just grab his camera from there. I think he's made it his mission in life, lately, to single-handedly undertake a survey of the local bird populations around our property.


This particular bird (you may have to zoom in above to see that I've taken a photo of him taking a photo of a bird in flight) had been hovering just outside the range of his lens for a few weeks. Apparently this was most frustrating, as it prevented him identifying whether it was a Nankeen Kestral or a Black-Shouldered Kite.

Luckily, a day or so later it seemed to have gotten used to him enough that when he approached the tree it was perched in it just looked disdainfully in another direction rather than acknowledge Dad's presence by actually flying off.


Which is how we know that we have a small family of Black-Shouldered Kites in the area, in addition to the vast numbers of crows, cockotoos, galahs, wrens, some kind of swallow relative we've yet to identify, and the occasional Wedge-Tailed Eagle.

Friday, February 5, 2016

Places in the garden

Kyle and I are both firmly of the opinion that you need a certain amount of 'silly' when embarking on a project like ours. So, as stories emerge of our exploits on the property we give names to the places they happen.

For example, my sister Rachael came with us when we first bought the place and we went to explore the creek. She's a bit more concerned than we are about getting muddy and wet, so when we jumped across the creek she said she'd find a better spot further upstream. We told her that was as good as it would get, but she stuck to it, so 500m further upstream she was stuck on the other side from us. Thus, this section of the creek is dubbed 'Rachael's Folly'.

Which, of course, necessitates putting up an artfully rustic sign...


... and taking selfies underneath it...


... to forever commemorate this event, and remind Rachael in future that she should cross there after all...


... we're not really sure how Rachael feels about this. But, now that I've posted it here I guess we'll find out!

Monday, February 1, 2016

Conceptual sketches

Kyle and I have been through 3 different engineers so far, and we think we've finally found the right one. We wanted someone with a bit of imagination of their own (rather than simply ticking boxes), who was a little excited about the unusual nature of our project (rather than daunted by it), who was willing to work with us as a team, and seemed to understand our vision for the property.

Previously we were looking at something based off the Arc House, designed by Owen Geiger, however given the wind at the site flat roofs were becoming more complicated and technical than we were willing to deal with and we've returned to something more like the Enviro Dome below:


To assist in communicating the vision, I'd done some conceptual sketches of our intended house, focussing not only on the internal layout but also the features I thought an engineer would need to be involved with.

Firstly, the vision for the future:


We imagine building the 3 domes of the house first, with small butresses to either side to act as a retaining wall on the berm. A little while down the track we'll add an outdoor covered area a little way off the house, again bermed by necessity because of the hill. This may or may not end up as a place for our cats to roam (enclosed) outside, as they are strictly indoor animals. Someday much further down the track, we want the option to extend the house off the other side if the mood takes us.

Bermed earth-walled structures make a lot of people nervous (even in spite of the whole earthship thing). Water is the first question to come up, so we wanted to have an answer (or at least the start of one) ready.


It seemed to me to be a no-brainer that the goal would be to avoid any water ever getting close to the waterproof membrane, so we'd need a drainage system.

It also brings up the question of ventillation. In a house like this, ventillation is another way of regulating temperature. The berm makes earth-tubes seem like a straight-forward idea, with the hillside allowing us to vent them downhill meaning we won't have the problems with moisture build-up and mould that plagued the early PassiveHaus models.


The exact point at which the earthtubes exit the hillside doesn't really matter at this stage, so I just drew curvy lines.

Finally, earthen buildings in wet parts of the world need a 'big hat'. I explored a lot of different ideas for roofing, and finally ended up with something pretty simple but hopefully functional.


I wasn't sure about insulation - seems a bit counter productive. On one hand it would keep any warm generated inside in in winter, but it would also stop the sun heating up the mass of the roof. I'm not convinced it would work out in our favour, and the engineer agreed. However, Council authorities like to see mundane, regular things like insulation when they approve Development Applications. We'll see how that one pans out, but I think we'll be good as it's usual for rammed earth structures not to have insulation in the walls.

I'd also done a drawing of the internal layout, on graph paper to make it more accurate for size:


Later on, however, I realised that we'd have to switch it around a little as the bathroom and kitchen can't be directly connected, but we want to retain that orientation for the kitchen/laundry so we can have morning sun in the kitchen.

The engineer we've chosen seems keen on all fronts, nothing is an obstacle just a technicality to figure out. We like this approach!

Saturday, January 30, 2016

Tuesday, January 26, 2016

A sink table

So we've been planning the outdoor kitchen for a while, and as part of that we want a barrel oven (eventually) and a place for convenient washing up. Thus, the idea of a sink table was born - a semi-mobile piece of outdoor furniture to make washing up a breeze. At least, more of a breeze than it is now with 5 people stuffed into my parents tiny motor home with one mini-sink.

We bought a sink from the tip ($10) - we wanted one with two sinks and two drainage boards, to make large batches of washing up easy.


With some bits of timber we had already (also from the tip, around $15) Kyle made a frame for the sink to sit in.


You can see the very technical numbering system that kept it all in the right place:


Once we had the frame, and the sink was screwed on (with screws from the tip - $0.50) Kyle started on legs. First he checked that he had them all the right length, so the table would be level and not wobble (apparently harder than it sounds).


Because we want the table to be very sturdy, Kyle did mortice and tenon joints for the cross pieces at the base.


 Once they were attached to the sink frame, he put another bar across the base as well. Notice the cut off corners - to avoid getting hurt by bashing your legs on the corner that would have stuck out.


Slats across the base will give it extra stability, and also provide a nice shelf that we can put some small plastic tubs in. This will be where we store cutlery and crockery between uses.


As a request from me, the ends of the big boards at the front and back of the sink frame were left on, and on one side Kyle added a little basket of slats that we can put bottles of detergent and so on in, and the other end there's extra space for plates to be put. There are also a few pieces of dowel across, as tea towel rails.


The front and back boards were painted, as they're most likely to get water on them. Then the whole thing got 3 or 4 coats of polyurethane.


Finally, the very bottom of the legs were capped with a bit of galvanised steel we had lying around to make them last longer. Kyle did up a template in cardboard first, and you can see that the corners are folded instead of cut so that water can't get in through an open corner.


I think the final thing is quite impressive, especially considering that the only part of it that isn't recycled from rubbish was the paint. Even the screws, nails and brackets were from the tip.


Once we have the outdoor kitchen structure finished this will find a semi-permanent home there, with piping underneath to take draining water away to a grey water mulch pit.

The whole thing cost maybe $30 to build, and perhaps $20 worth of paint to make it last longer (we didn't use a whole tin, which we'd bought for something else originally anyway, so hard to tell exactly how much). It took Kyle around 5 days worth of work to build and paint up, stretched into sessions a few hours long over the course of about a month.

Outdoor Kitchen - part 2

(Part 1 here)

After the posts were concreted in Kyle mostly worked on finishing off the toilet block, while my parents and I worked on the kitchen structure.

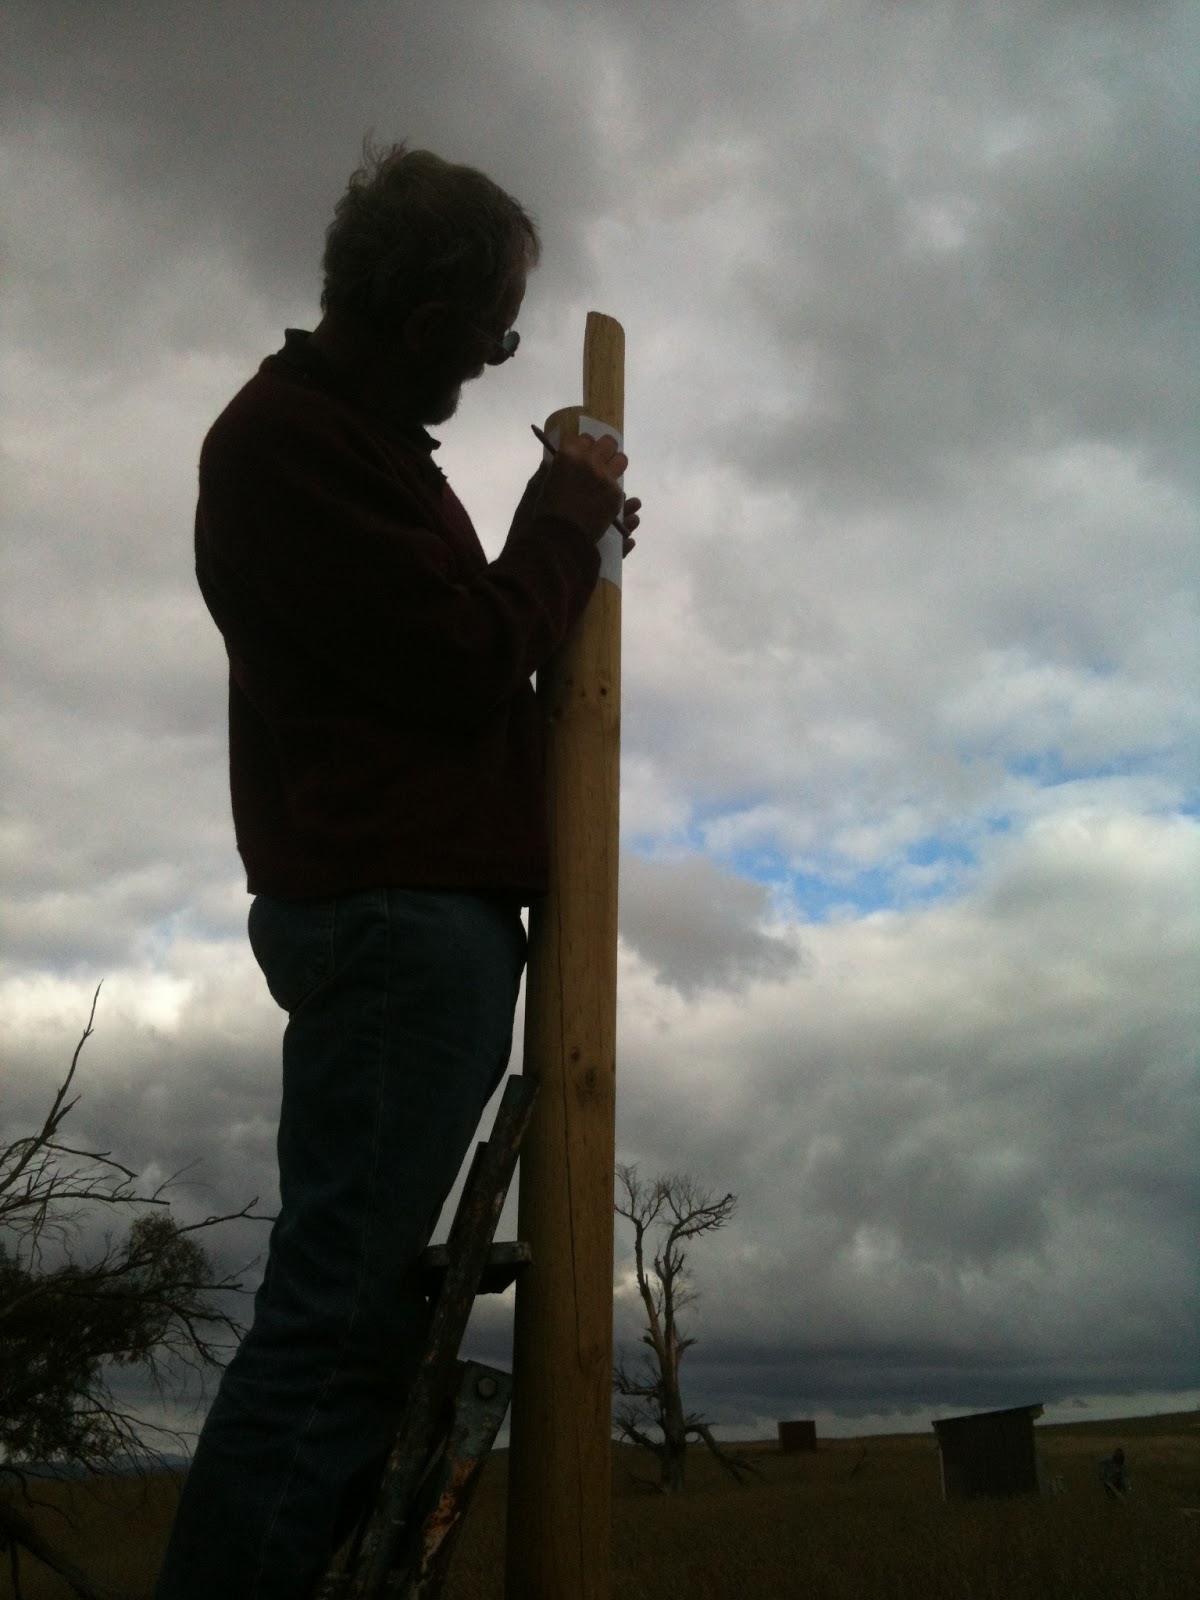
Dad and I raised the long beams with the help of some ladders. We did find, though, that Dad's careful measurements were a bit out, necessitating climbing up one of the posts and cutting a bit more off:


We clamped them to the ledges we'd cut out on the posts, then put a bolt through each one.


You can see below that the beam furthest from the camera is still a bit higher at one end compared to the one closest to the camera. We figured it wasn't enough to make a fuss about, and it will all work out close enough.


We clamped all of the short beams together, and Dad cut lap joints with a circular saw while I chiselled out all the uneven bits so the rafters would fit flush.


Because the roof is tilted (it has to be so rain will runoff) each beam needs to be angled slightly at the end so it will fit flush. They also needed a little wedge chiselled out so they'll fit into the U-brackets at a nice right angle.


It took 3 of us to raise the beams, though by the 4th one we were a bit more confident on the ladders and could do it with two of us.


You get into a routine after a while - lift the beam on one end, slide it into the U-bracket, lift the beam at the other end and rest it on the long beam. Things got interesting with the final knock into place - because there was a slight flex to the poles, and we were putting weight on from one side with the ladders, if we put the ladder in the middle of the building facing outwards as was most comfortable the long beams ended up too far apart and we couldn't get the short beam to hold. So we moved the ladders to the outside, but then they were too close and the beam didn't fit! So we put it in the bracket at one end, then one of us got down and leant against the poles on that side to give it a few more centimetres at the top so it would all fit.

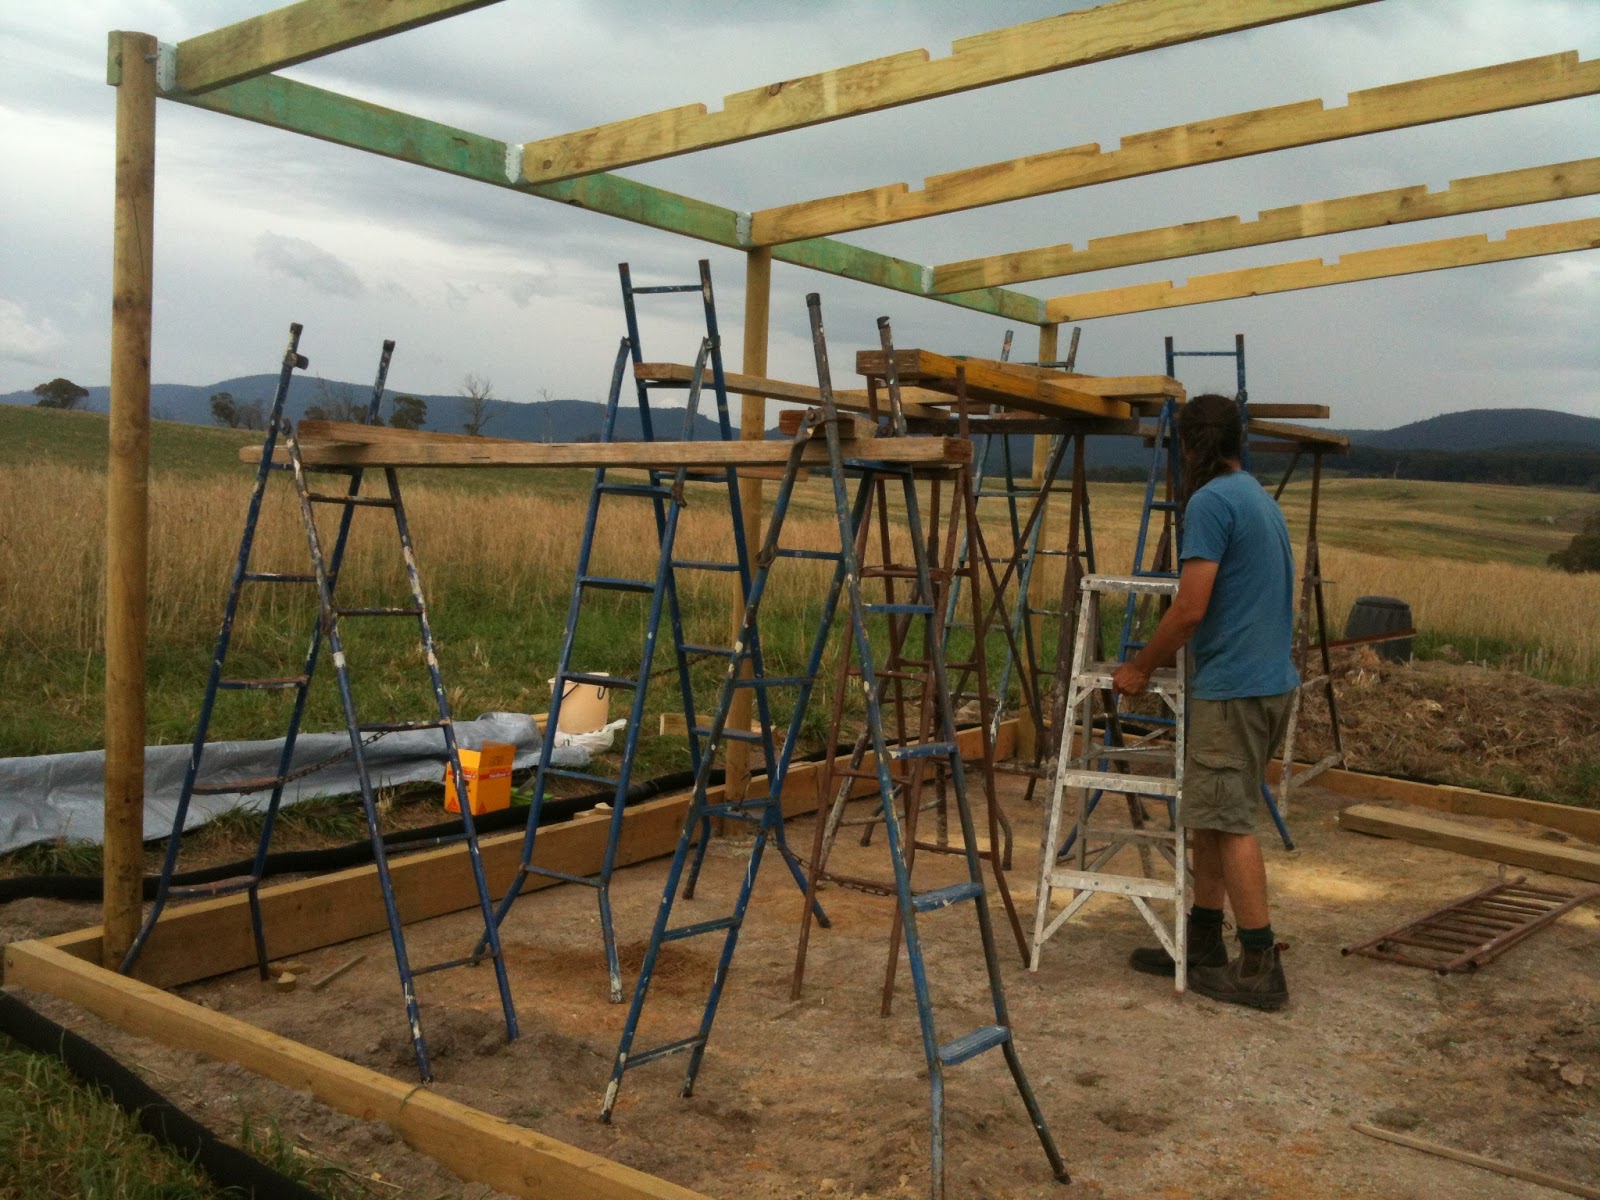
Once we had all 5 beams in place and secure, Kyle exercised his ex-painter skills to raise some ladders and planks for us to fit the rafters.


Scaffolding like this looks dangerous at first, but it isn't really. It takes Kyle about half an hour to set up, checking that each ladder doesn't rock at all, and that each plank is stable and flat. There's quite an art to it, and I'm glad he has experience with it as more than once I've realised the seemingly hap-hazard placement of planks just happens to be exactly where is comfortable to have somewhere to put my feet given the structure we're working on.

I think Dad was skeptical at first, but he seemed to warm up to it.


We did the middle rafter first, as one of the beams was a little bowed. We measured carefully the distance between each beam at the ends, then marked the rafter in those places so that when we fit it into the lap joint we could use it to adjust the beam to make it straight again. Each lap joint got glued, clamped, and nailed.


When you finish something like this, it necessitates selfies from the top of the scaffolding.

The point where short beams attached to the long beams we put nail plates over the top. This way, any force pulling the beams apart puts the nails under shear instead of just pulling them out of the wood. We also stuck nail plates over the lap joints at the end of each rafter, because we had some left over and why not?


Getting the whole frame up took us the better part of 3 days, spread out over more than that due to weather and other commitments. A day of concreting, a day of beams and cutting, a day of rafters. Don't be fooled into thinking you can do it much quicker than that - at first, with this project, I would get so frustrated at how slow everything went, but I've learned to be more realistic with time.

After this, we put corrugated metal roofing on (second hand from the tip, I think it was originally colourbond fencing). Each row took us a few hours, separated over several days because of the weather and having to move the scaffolding in between.


As I write this we have the second of 3 rows up (though only one is pictured here), but have had to take a break due to rain. While Kyle and I return to Canberra for the working week, my parents have said they'll finish levelling the ground under the structure and fill to the edges of the retaining wall (something we'd left undone until now as we needed more drain pipe).

Finally, after all this hard work, one needs a bit of a rest...

(Dad, tucked in on the couch in the motor home)