Showing posts with label Structure. Show all posts

Saturday, May 14, 2016

The power of the wind

We turned up at the site today to find that the site shed (a good 12m long, weighing in at somewhere around 3t) had shifted about half a meter at one end, and toppled off it's concrete blocks.


After much discussion, Dad and I spent about half a day very carefully jacking up the structure again and removing the blocks before re-stacking them. We cut out the soil underneath to tilt the blocks inwards, and Kyle shaped a block of hardwood to fit in the triangular gap to provide a flat surface for the joists to sit on, and a little shelf cut out so it couldn't shift side to side.


What we think happened is that in the strong gusting winds the end of the shed had shifted, milimeters at a time, and eventually ended up on the edge of the previous stack which caused it to topple over and move the whole thing such a substantial amount. We're hoping that the angle of the blocks here prevents that incremental movement in future so it can't get to the point of toppling again.

But, to be sure, we dug a hole about 45cm deep and used some leftover concrete we're glad we had lying around to sink half a sleeper right up against one of the main struts. Currently we only have one, as it was an awkward hole to dig (half under the structure) and so took us a long time. The aim was to get the building to a point that was stable and safe first, before ensuring it stayed that way longer term.


We're going to add another couple of these posts (we've got loads of sleepers leftover) until we have a few on each side, though the prevailing wind is strongly from the northwest so this first post went on the northeast end (the end that shifted).

The other possibility that occurred to us was that the building could roll. The wind is very strong, and it's close to side-on (we wanted a cross breeze in summer). We're not really sure how much of a risk this is, and have no way of knowing. My assumption is that the shed is bottom heavy (there are two very large steel girders, with substantial steel joists across, that make the base of the structure, whereas the wall joists are smaller and I think aluminium). However, while the chance of it tipping may be low the consequences if it did so would be catastrophic - I doubt the structure would survive, nor potentially would we if we were inside at the time. We'd certainly have no way of righting it again ourselves.

A few suggestions were made, everything from angle iron braces on either side, and guy wires. Eventually our favourite suggestion so far came up - webbing and ratchets (substantial ones) attached to hooks concreted into the ground on either side, strapped over the whole structure at solid points. We're still figuring out the details that will make it work, and may yet do something different. We have most of the stuff for this strategy already, and it would be fairly quick to implement, whereas any other way would require us to go buy a bunch of materials.

For the moment, crisis averted. But we'll watch this space very carefully for signs of movement.

Wednesday, May 4, 2016

Site Shed

Time pressure on self-builds is a funny thing. It makes everyone mad and stressed. Most people try and make it go away by having a temporary house while they build the main one, to avoid paying rent and building at the same time. Often a caravan, or garage that's been converted, that kind of thing.

We'd had it in the back of our heads for a while, even tracked down a mining company that was selling off a bunch of temporary accommodation blocks a few months back, but we had trouble finding something with more than one window that was within a reasonable distance. Then we found this on GumTree:


It needed a fair bit of fixing up, but was very cheap, so we figured we didn't mind. Getting it to the site was a whole day, then it took us three weekends worth of work to get it completely weather proof. One day of silicone and caulking guns on the outer walls, about half a day for Kyle on the roof (we went over all the screws as the seals had perished, and up under the edge of the rim just in case).u

There were 3 big rectangular holes in the wall, one in each of the 3 rooms, that had had air conditioners in them. Kyle tidied them up a bit, then screwed a sheet of perspex over two of them. We sealed up the outside, then Kyle plastered up the edges and put frames around them to make them look like windows.


The third one, though, still had the metal frame that had held the air conditioner itself. We decided to leave that in, and make a little hidey hole for our cats with it. I cut away the vent screens with an angle grinder, and gave the whole thing a good clean. Kyle put perspex over each of the gaps and sealed it up with silicone.


I'm going to make a full height scratching post for our two cats to climb up to get to their sunroom. But first, we had to make the rest of the place liveable.

Pulling up the old vinyl flooring took a lot longer than I thought it would, and it was a hard job. The old vinyl was very brittle, so you couldn't just get a big patch then pull, it came off in tiny little pieces more often than not. Eventually my Dad had the bright idea of hooking Mum's hair dryer to a long extension cable plugged into their camper van, which softened the glue enough to help.

At this stage, the walls are sealed (inside and out), the old floor is out, we've bought new flooring, and will likely put it in sometime in the next week or two. We did spend the night in the end room one weekend, and it was bitterly cold, so we're exploring our options for adding to the ceiling insulation, and I'm going to make some thermal curtains for all the windows. We'll look into diesel heaters as well. Given this is a temporary home we don't want to spend too much time on it - we'll get it comfortable, but our focus is still on the main house.

Friday, January 15, 2016

Outdoor kitchen - part 1

We wanted a large, covered area that we can use as an outdoor kitchen during our build. This will become an entertaining space later on, and is a great water collection surface. We'd done up rough plans, and had a few chats with my folks about it, but at the time Kyle and I were really focused on getting the toilet block finished.

Apparently, when you tell your Dad "jeez, I'd really like an outdoor kitchen..." you come back 3 days later to cleared and leveled ground, two retaining walls, and 6 post holes.


We thought we should catch up at that point and buy the timber for the structure, so we let him loose on the maths of putting it all together. There was much discussion about dimensions (6m x 4m, determined by the size of readily available timber) and how many beams/rafters to have, during which we scribbled madly trying to end up with a common vision for how it would fit together.


After clearing the grass, Dad levelled the site with the help of two stakes, 10m of clear plastic tubing and some potassium permanganate (makes the water level easier to see - you can usually get it at a pharmacy).


He tells me that each of the post holes is within 1cm of the depth of each of the others. He was a bit grumpy when we insisted he put some gravel in the bottom first, saying it messed up his measurements.

Because of the slope we'll have a short retaining wall at the top and bottom of the structure. We had the sleepers already (we bought about 35 of them cheap and used some for roof beams in the toilet block), so that was an easy fix. The structure is set up so that the posts will form part of the supports for the retaining walls, but because of the length of the sleepers this isn't quite sufficient so we had a few shorter sleepers to hold the rest of it up. The bolts came with the sleepers when we bought them, so again a neat solution.


The bottom of each hole has a few inches of gravel and some sand we dug up from the creek bank, just enough to lift the posts out of the soil before we put some quickset concrete around the base. After much debate, we used rounded poles instead of square ones. Kyle tells me you can't get square ones that are treated better than H3 (at least, we couldn't get them), and since these are going in the ground we wanted to be thorough. We weren't as careful with the toilet block posts (we're still learning), so I guess over the next 20 years we'll see the difference. In reality, I suspect longevity has a lot more to do with drainage and not letting water sit at the base of the posts. We contemplated using metal stirrups and decided it was too hard to get them in exactly the right spot - we'll tackle that one on some other project I imagine.

After that, Dad cut ledges in the top of each posts, and on a fine day Kyle went out and helped concrete them while I was at work.


You'll notice here that the posts on the downhill side are a bit taller than the posts on the uphill side. There was considerable discussion over which way to slope the roof - my parents argued for sloping it against the hill to maximise the view, whereas Kyle and I are practical people and were much more concerned about rain and sun getting in. Eventually we decided on the former, as it makes the hookup to the eventual water tank a bit easier.

We'll wait a few days until the concrete is really set before adding the beams. Dad did admit at one point that his precision measurements probably wouldn't hold up to reality, so we made sure we bought cross beams that were a little longer than the intended measurements (4.2m rather than 4m) so we could cut them to fit if we messed up elsewhere. Also, as they are at an angle they need to be slightly longer than 4m anyway to reach.

Thursday, January 14, 2016

Composting toilet block - part 2

See part 1 here.

Once we had all 9 posts set...


... we added a few more cross pieces to hold it all steady (there was a bit of give in the posts)...


... then started on the roof beams. These were braced with right angle brackets to hold them in place. We arranged them so we had a little bit more roof over the front, where the doors will be. The slope of the roof follows the slope of the hill, which is nice and convenient as then all our posts could be the same length and achieve a nice even slope quite easily.


Then we put in 4 rafters. This involved a lot of sawing and chiselling out of the joints, something Kyle was good at to start with and I like to think I got progressively better at with time.


The rafters were nailed in, and had brackets as well. Our site is quite windy, so we went to the effort to make this really super sturdy so that once it has the cladding on it won't blow around.

Then we painted the whole thing. Kyle used to be a painter/decorator, and is very keen to tell me terrible tales of what happens when people don't paint things properly (it rots). Since we've put a fair bit of effort into our toilet block, we want the additional longevity the paint will give the wood. The paint was cheap at the local hardware store as it had been mixed up to the wrong colour - the people there keep a shelf of mis-mixes for cheaps, and since we didn't really care what colour it was going to be this suited us well.


We were interrupted for quite a while here as the spring rains, pushed along a bit by an apparently extreme La Nina event, just kept coming every weekend we tried to go out there. We even bogged our van one time when we got a bit overconfident on the grassy hillside. We are now pro's at unbogging vans.

Eventually the rain cleared up enough to get the roof on...


... and the walls...


Kyle started panelling the inside with timber offcuts we had collected from the tip over the last few years. I quite like the random, rustic feel of it. The panelling stops all the radiant heat from the metal making the whole place an oven in summer.


Then we went to the tip to get doors. Hanging these was a bit of a team effort, as one of them is officially the heaviest door on the face of the planet.


You'll notice there's a gap in the wall panelling at the top on the back. Since this is the northern side it gets a lot of light so we put a window there! I took polycarbonate sheeting and bent it around the end of the rafters. There's a piece of window ledging underneath, and Kyle put proper window glazing on the lower sill edge so it won't leak in the rain.


At the time of writing this we've gotten a little further and are almost completely done, but I'll put that in a separate post as getting the seats right was a bit technical.

Tuesday, November 10, 2015

The arrival of the bags


We ordered our woven polypropelene tubing from the Bundaberg Bag Company, who were the only supplier we could find in Australia that would confidently sell us tubes instead of bags. A quick look through their facebook page shows someone from their end has been involved in a few international build projects - I'm not entirely sure, but the water tank they built in Vanuatu back in April looks a lot like the one featured in a "how to build an earthbag water tank" instructable I found a while back.

The tubing comes in two sizes, 460mm and 350mm. Rolls are 1000m long. I ran the maths as best I could, and I came up with 4x 30kL water tanks at just a smidge less than 1000m. That was cutting it a bit fine for my rough calculations, so we decided to get two rolls of the 460mm as it's best to do water tank walls tick. This way, we'll easily get 4 water tanks and have some left over for experimental practice and the lower levels of the house. We'll probably end up getting another roll of the narrower stuff for the house build, as the upper levels of the dome can be narrow and the lower levels wider, but that's later on.

All up, including delivery from Bundaberg to Canberra, it cost us around $1400. We messed around with the idea of having it all delivered to my parents place in Brisbane and getting them to bring it when they come, but it turned out not to be a huge difference in shipping costs.

Friday, October 16, 2015

Composting toilet block

One of the first things we want on the property (after our symbolic veggie patch) is a toilet. Seems a no brainer to have a composting toilet, as we'll need to plant lots of trees in a few year's time. This is distinct from the smaller loveable-loo model we hope to have in our house - this structure has not been recognised by the council, though so far as I can tell it's in a legal grey area, and it's for the lead up to and during the build rather than while we're living there (though no doubt it will continue to come in handy into the future).

We've drawn great inspiration from Milkwood Permaculture's 'most loveable loo in the west' with bin specifics, amongst other various people who've done what looks to be about the same thing. We love Milkwood - whenever we decide we need to work out how to do something (build an outdoor composting toilet block, for instance), we set forth onto the Great Interwebs and seem to end up on their blog looking at exactly what we wanted. Essentially, two wheelie bins sitting under a corrugated iron shed of varying fanciness.

My initial (very rough) concept drawings give you a bit of an idea:


The patch of ground where we want to put the toilets is sloped down to the north, so we thought we'd take advantage of the slope to take some height off the building. The bins will be on the northern downhill side, so the chimney for the vents has lots of sun to heat it up and encourage air flow and the ground is naturally lower anyway. Entry will be from the south, up the hill a bit. There will be a retaining wall along the middle of the block, that the bins will butt up against when under the building. That way we don't have to create flooring that supports people's weight, we'll just use pavers from the tip to make a solid, level floor at two different levels (one for the bins to sit on, one for the people to walk on).

Since we have the space, and we're building a structure anyway, we figured we'd make each 'cubicle' big enough that someone could comfortably get changed in them, and have a bit of space for storage of things like extra toilet rolls.

We prepared the bins late one night, just before the shipping container was due to arrive as we knew we'd need them pretty soon.

...


We've got taps on the sides rather than at the back, as the taps protrude a long way and I was worried they'd get knocked on the ground as the bin is being wheeled around if they were on the back. Vents are on the opposite side as that works well with what the chimney for the vents will be doing. We did two bins this first time around, one left hand sides one right hand sides. The bins cost us about $130 each to make up, most of that being the bin itself at $95 from the local big-chain hardware store. We made some expensive choices on things like tap fittings as we want them to last, and we went out of our way to get black coloured bins, but the rest came from the tip.

Out at the property the next day we took the bins along and laid out where we wanted them to go. We'd measured them of course, and had a rough idea of the size of the building, but wanted to mark it out on the slope itself as we didn't have a measurement for that.


We put the bins in place, then sunk star pickets along where the wall above them will go and where the retaining wall will go. Then we cleared the grass from that spot. You can see my pitiful little section on the left being rapidly overrun by Kyle's on the right - he's a lot faster at this bit than I am. In my defence, though, it's not quite as pitiful as it looks in this picture as post of it's hidden by grass in the bottom left of the photograph.

Accuracy didn't matter too much at this stage, as it's just to have grass-free space to sink the retaining wall and the posts that will form the structure onto which everything else will cling. The posts are the point at which proper measurements and making sure things are really square starts to matter. The grass doesn't care if it's square or not, and the star pickets are just our guide for where we needed to clear.


Clearing grass is hard work, but satisfying. Took us about an hour and a half for this bit, with frequent brief stops to check the rain that was looking a bit threatening on the horizon and the nearby cows that were becoming accustomed to our presence and getting a bit curious.

A few days later we returned to lay the retaining wall. We reluctantly bought two new sleepers after failing to find anything suitable at the tip a few weeks in a row. We dug out the downhill section of our little bare square, and settled the sleepers in place.


Then, we dug three post holes. Kyle had already cut the notches for lap joints in the posts. After much discussion we decided to piece the beam together into the lap joints and fix them in place (square) with brackets before we set the concrete to hold the posts upright. This worked quite well, as there were only two of us and we didn't have enough hands to hold everything in place otherwise and make sure it was all square.


We lay drainage tubing on the earthen side of the retaining wall for good measure, then started sinking the downhill posts as well. These were a bit easier, and we ended up doing them one at a time but held in place by a few star pickets sunk into the grass and tied with rope. We hadn't wanted to do this for the middle ones, as it would have meant disturbing our nice firm ground with star pickets just after we'd dug holes for posts.


We ended up with these a bit off square anyway, though not an insurmountable problem. We learned from this and fixed our methods a bit on the other side. Of course, being interrupted by a hail storm doesn't help much - all of this took place over several days.


Once all the posts were concreted in, Kyle got a bit hammer-happy and put up bracing on all the walls. This will be what we screw the corrugated iron wall cladding to later.

At this stage we have 8 out of the 9 posts in (we would have had all of them, except for our hail storm interruption) and all of the structural cross beams are in. The next step is getting the roof beams on, then attaching the corrugated iron walls and roof ($50 at the tip for a big stack of it, what a find). After that it's things like seats, probably some shelves inside, and finding a source of sawdust.

Saturday, August 22, 2015

Water tank plans

We decided some time ago that it would be a good idea to build water tanks out of earthbags. Plastic or steel are expensive, concrete is just too much work. Plus, it gives us a chance to practice. The plan is to build water tanks over weekends, get water delivered to the site, then we can use that water during the main build (it won't rain enough between then and now).

For houses not connected to mains water the minimum on-site storage capacity that the council will approve in connection with a dwelling is 110,000L (90,000L for domestic use, 20,000L dedicated fire-fighting supply). As in, they will not approve a dwelling that includes a smaller water storage capacity. We asked, but apparently the lower demand for water resulting from use of waterless toilets doesn't count towards the mandatory capacity, so we still need to put in massive tanks. Realistically we know this is only a good thing, and we'd want to do it anyway, it's just a bummer to have to do it now.

First we had to work out how big they should be. It makes logical sense to want smaller tanks instead of one big one. Materials and so on come out a bit more expensive, but it means you can do maintenance on one while still having water storage in the other. I triple-checked with the Council and apparently on land zoned RU1 (which we are) above-ground tanks of any size count as exempt development, meaning you do not need to apply for council approval for them (in most other zones you need approval if it's bigger than 10kL). This stumped me a bit initially, as it didn't make sense that we needed extensive engineering consultations for the house, but the water tank (bigger, heavier, severe consequences if something goes wrong and multiple kL of water go rolling down the hill) is good to go regardless.

So we went through a process of working out whether to worry about that. We are aware of quite a number of 15-20kL tanks made from earthbags in various parts of the world. This proves the concept works, but what about a bigger tank? Will an increase in the diameter of the tank increase the outward pressure of the water on the walls? At first, logically, it seems like it should. More water = more pressure, surely? In a water tank we're primarily concerned with hydrostatic pressure (because the water isn't moving, so the only force we need to worry about is gravity). Pressure is related to the depth of the water, not simply the volume. The parts of the tank wall closer to the bottom will receive more pressure than the parts of the wall closer to the top, but the wall at the same depth doesn't receive different pressure if the volume of water is greater. So if we have a 2m tall tank that is 3m diameter, and a 2m tall tank that is 6m diameter, the pressure on the tank walls is the same even though the volume of water is greater.

Greater water depth = greater pressure, regardless of volume
(this is why people put water tanks on stilts, to get higher water pressure)

The next part to think about is the hoop stress on the walls. Hoop stress is the pressure perpendicular to the axis of a cylinder (so the walls of our tanks), and is related to both the radius and the thickness of the walls. Physics textbooks usually use the example of the pressure on the hoops of a wine barrel (I'm pretty sure that's where hoop stress gets its name). This is where it got hard for us, no one we found had done studies on the maximum hoop stress earthbags walls can withstand. After some very extensive internetting (including some excellent spreadsheets for materials calculation covering all potential water tank materials except earthbags) we realised that this was simply unknowable for us. Someone, someday, might conduct the stress tolerance testing to figure this out, but it won't be us. Given that, it follows logically that the safest approach is to ensure we use the widest possible bags (as hoop stress is related to both radius and thickness of the walls - to be safe within the unknown, maximise wall thickness).

Finally we wanted to thought experiment with what would happen if we were wrong and it all fell apart. There is potential for cracks to form in the tank wall over time, which would be a problem if we were sealing it with concrete and painted sealant. So we're going down the path of a tank liner instead. We think it is a reasonable assumption, though, that if the tank walls did start to fail this would be a very slow process over time and we would be able to monitor it as the tanks age. It seems likely that points where pipes fit into the walls of the tank are the weak points, rather than the structure of the wall itself, and any failure is likely to come from the fittings first. If we do notice the wall beginning to bulge outwards with time we can look into ratchets and strapping and see how we go, but again this is likely to be a process taking years rather than giving way overnight. As a bit of additional structural support, during construction we will use a trick I've seen in a few accounts of earthbag building, particularly in earthquake zones, where metre-long lengths of rebar are hammered down through the wall at regular intervals.

So, we have a bit of leeway with tank size from a structural perspective. Therefore, it comes down to convenience and cost. Given we need 90kL drinking water all up, we end up with the option of 2x 45kL tank or 3x30kL tanks. We also need at least a 20kL tank for fire-fighting water.

Kyle, who by virtue of having a more happy-go-lucky approach to life than ever-practical me, is in charge of ensuring we don't go too fast with this whole project and forget to have fun. In an effort to make his contribution to the water tanks he's suggested we should put crenelations on top and paint the sides to look like stonework. He reasons that since we have to have a bunch of big, round, tower-like structures anyway we might as well make them look cool. We met at the local historical re-enactment society, so this isn't an entirely left-of-field suggestion.


With this in mind, plus practical considerations such as the time it takes to build each tank, we think we'll go with a total of 4x 30kL tanks. My rough maths (aided greatly by Google's cylinder calculator - just google 'volume of a cylinder') tells me that a tank that is 2m tall will need an internal diameter of 4.4m to hold 30kL. Note that the height here is not the total height of the tank but the height to the overflow, as the roof (and any crenelations, if Kyle convinces me this is a good idea) will be a little higher by necessity.

Overall, dealing with the water tanks first is a good move. It will allow us to try out the whole earthbag concept in terms of materials calculations and get the hang of how it will work on site with groups of people doing stuff before we get to the complicated part (cylinders are pretty straight forward). That way, when we get to the house, we're familiar with the process. At least, that's the theory - we'll see over the next few months how that turns out in practice.

My budget hesitantly puts material costs for the build of each tank at around $1500 (including earthbags, tank liner, and fittings), but I'll go into further detail on that once it's a more precise estimate. I suspect our strategy will be to build one or two, then build the house, then do the rest at the ever indefinite 'later'.

Sunday, August 2, 2015

Engineering approval

We've had to search for a bit to find an engineer willing to deal with a project as strange and small as ours. I don't think that's so much because what we want to do is impossible, rather that engineers tend to have slightly grander visions than our humble little house will be and aren't really happy to go to so much effort for such a little house.

But, finally, we have found one. We have been very careful when choosing the professionals who will work with us to make this happen. Getting the wrong kind of engineer would be disastrous - not in terms of skill, but in terms of personality and approach. We needed someone who was game for a challenge, who was willing to deal with owner builders who aren't going to do things the way they are normally done just because we don't know what that is, who wasn't going to fight us on things that mattered to us (which are likely to be the really tough parts). So we've had quite a number of conversations now with various engineering companies in which we describe what we intend and then wait for their reaction before politely moving on to the next one. This latest guy was quietly interested during the initial conversation, but referred to our project as 'exciting' in his follow up email, and said he was game for anything that would get him out of doing yet another brick or timber frame - we figure that's a good start.

Going in to the next meeting, where we nut out the details, we had a list of things we thought would cause problems discussion:

  1. Foundations - we prefer not to use concrete, and know that earthbag buildings are routinely built with gravel footings instead. We also know that the only other council approved earthbag house we are aware of in Australia was forced to use concrete foundations, so this was high on our list of concerns. Not only is concrete production a massive drain on energy resources and a massive producer of carbon dioxide, it's also expensive.
  2. Bond beam - again, we know this is often required in earthbag houses, earthships, strawbale houses, etc. Anything odd it seems the powers that be believe slapping a ring of concrete around the top will somehow make it ok where it was not before. We hope to also avoid this, but are not as passionate about it as the foundation.
  3. Lofts - borrowing the idea from tiny houses, we're keen to introduce two lofts in our little house, one above the living room and one above what would have been the only bedroom, which will give us much more space. This may cause issues with regulations that restrict minimum ceiling heights, problems that are avoided in tiny houses due to the whole house being classed as mobile.
  4. Wind - the wind at the site is quite strong (I have high hopes down the track of introducing a wind turbine) and whilst this probably doesn't affect the walls as they're so heavy it may affect the roof.
  5. Soil testing - we assumed this is necessary before any foundations can be approved, however we figure while they're testing soil for one thing they can test for others too. We also need soil testing done for our grey water system.
Turns out the foundations were easy - soil testing will confirm, and apparently we have to pick spots that have the underlying rock close to the surface (there are good spots on the site for this). The bit about the rock seems to be more to do with tying everything down so the wind doesn't blow the roof off than issues with the walls shifting over time.

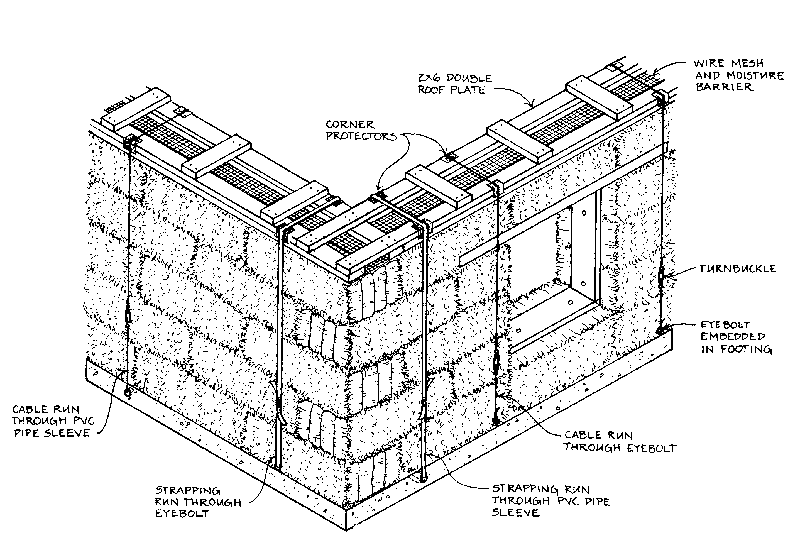
The bond beam was also easy - no concrete required. Again, the issue is the roof blowing away in the wind. To find something to tie the roof to, we'll use something similar to the wooden ladder beams that are sometimes strapped to the top of straw bale walls, just to give the roof something to tie down onto. Rather than strapping the ladder beam to the foundation, though, we'll pass the ties under 5-6 courses of earthbags as they will be heavy enough to keep it secure.
It looks like the engineering approval work will cost us around $2000-3000, which is both fairly reasonable and fairly unavoidable.

Settlement on the property (when we officially take ownership and then can start doing stuff) is a little over a month away, so should be a good amount of time to get all the details for the Development Application sorted so we can put the application in right after we settle and be ready to go soon after. Waiting for council paperwork before we could exchange contracts on the property set us back a bit from where we'd planned to be, but on the flip side apparently we don't need any approval for water tanks (I've triple checked and have it in writing from the Council) so we can do that while we wait.

Sunday, June 7, 2015

Very rough plans for a little house

The inspiration for our current plans are largely based on a design by Owen Geiger at the Natural Building Blog. I don't know if anyone has ever built this house design (whilst plans are available from the site, it's not clear how many people have purchased each one let alone built it).


I ditched the curve fairly early on, for simplicity's sake, though it means putting in buttresses to support the walls. This was helpful initially doing drawings and sketches, but more recently I've wanted to add them back in again. At first I diverted quite a long way away from the original layout, and found myself coming back to it with each drawing. Eventually, the only addition was lofts.

Currently these plans have been done just by me in SketchUp. Ultimately we'll need to involve an architect, or a structural engineer at the very least. But we want to have a very clear idea of what we're asking for before we do, as it's unlikely we'll find people who have experience with this kind of building. Given the overall project it's also important that either Kyle or I (or both if possible) have a pretty solid understanding of the whole thing and each of the features we want to use so that we can take advantage of recycled materials we find, and if something doesn't happen as planned during the build we can improvise effectively.


I'm not really convinced by the split levels in the roof. I did it that way at first, so we could have a loft on one side, but in hindsight I think it'll be easier to have the whole roof at the same level and have lofts on both sides. The split is likely to be a weak point for leaks, and difficult to put together. Then you need fancy bits for guttering, and the higher the roof the less restricted you are in terms of water flow into tanks given the loss of vertical height in leaf traps and first-flush diverters.


There are a lot of details still to iron out. I'd like it to be a bit smaller overall, but we'll have to work on the layout a little and work out how attached we are to our current furniture. For example, we have a big purple couch at the moment. We love it dearly, chose it very carefully, and use it thoroughly. But, we could have a couch that is also a rocket mass heater. Having such a large object fulfil multiple functions makes good sense in a small house. In-built furniture has other benefits, you can work ventilation around it more easily, it can be structural support for something, and you don't have to worry about the fabric fading in the sunlight (not that I did anyway, clearly I make a poor homemaker).

So it will be a little while before our development application gets made, but we have a start. Aside from the house plans there are other plans, like the composting toilet application and solid fuel heater application if we do decide to put in a rocket mass heater (seems a no-brainer to me).

Saturday, March 7, 2015

Planning for bushfires

Kyle and I are both well aware that bushfires in rural NSW are a case of 'when' rather than 'if', and that our safety will likely one day depend on having planned effectively for what to do when bushfires inevitably come our way. This seems particularly relevant when bushfire season is in full swing over summer.

So, at some stage in early January I started hunting for information on preparing rural properties far in advance of a fire risk.

Since it came up first on all my searches I started with the variety of widely publicised, government sponsored, bushfire safety fact sheets, figuring I could work backwards from there towards something more substantial (they always have that bit at the bottom that goes "for more information..."). However, I was a little disappointed.

I'm not particularly keen to simply take the advice from government factsheets at face value. It is reasonably likely that at some point in the next 20-30 years Kyle and I will be trusting our lives to these preparations so in my search for information I was after something more substantial than 30 pages worth of "that sounds like good advice to me". Given that the majority of this advice is aimed at more conventionally built houses (complete with ceiling cavities and wooden panelling, none of which we'll have) I was looking for some of the evidence underlying this advice so I could make an informed judgement about how it would apply to our rather different situation.

Now, don't get me wrong, I fully appreciate that the factsheets and bushfire plans and so on from the government and the RFS are probably responsible for saving many lives. I'm just not convinced that they're the best source of information available. The deeper I dug the more I found that any evidence that was actually available to me contradicted the advice in the official factsheets. However, the evidence also made me more confident of our ability to successfully design a property to be defendable - there's nothing like stories of people surviving firestorms in weatherboard houses to make you feel better about your earthen home's fire resistance.

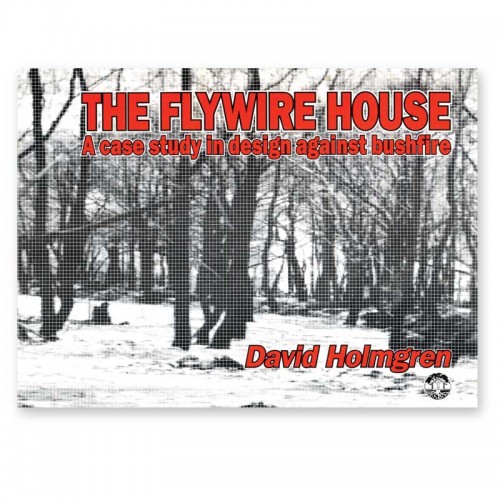
Amidst my searches, I found a book by David Holmgren (unsurprising really, he seems to pop up whenever I have a question no one else has solved yet complete with a publication date sufficiently far in the past to make everyone else embarassed at not having figured it out themselves yet).
I bought a copy, and was suitably relieved when reading it. This was exactly what I was looking for - the book lays out an example of a property design that emerges as a consequence of good permaculture design and covers all aspects of the property that can act as structures and processes to seasonally prepare and defend the house itself. This makes a lot of sense to me, and is consistent with the stories I found of people experiences in defending their properties during bushfires.

Thursday, December 25, 2014

Roofs

Considerable thought has been given to roofing on the various designs we've come up with. For our little house we like designs that are domed - the build is a little easier for the flexibility of the space the provide. Plus there are pleasant hobbit-hole connotations. However, it tends to get quite wet here in winter and earthen plastered domes don't do well in wet climates. In fact, 'big hat' tends to be a rule-of-thumb buzz word for earth houses.

It also occurs to us we'd like to collect water from the roof of our house, which is hard to do with earth plaster.

So I've been looking into roofing on domed earthbag structures. It seems there have been a few people who have experimented with this already.

Many variations on ferrocement moulded hat-like roof structures:


Several that have incorporated moulded guttering into the structure of the dome itself:


One that I've found with corrugated iron raised up from the dome:


And the all-time stylish favourite, shingles!


Originally I was trying to work out something similar to the corrugated iron dome, but I'm fairly severely arachnaphobic and can just imagine how many cobwebs would end up in the gap between. I was in the process of working out how to close that gap by bringing the corrugated iron close to the dome and plastering any openings, but at that point began to wonder whether attempting to bend the metal and cut it just right to size would be worth the effort - in such an organic structure surely there is a more organic solution to roofing. Which leads us back to ferrocement.

My biggest concern with ferrocement was lack of waterproofing, necessitating a coating of some sort. Early searches into types of paints and sealants suggested to me that many would result in small amounts being mixed with any water collected from the roof over time. Plus it's just another material we'd have to buy, learn how to use, apply, and maintain. Simple is best

But then I discovered magnesium cement. I still have a bit of homework to do on this one, but it seems a viable contender as a roofing material that is flexible to the more organic shapes of the domes, waterproof, and suitable as a surface for water collection.

Saturday, October 11, 2014

Radon Off-gassing

Until very recently I'd never even heard that Radon in homes could be a problem, so when a friend of mine mentioned to me a few weeks ago that it might be a concern in an underground house I began looking into it. What I came across was a bunch of websites from the USA telling me about how it leads to lung cancer and I should be very worried about it, and here's who I can pay loads of money to to fix my home. Ka-ching!

I like to look a little deeper into things like that.

So, I started with what its all about anyway - where does it come from? Apparently, underground. The gist of it seems to be that Radon gas exists in the soil, at varying levels across the world, and slowly leeches up into the atmosphere. It's radioactive decay over time can contribute to lung cancer and other unpleasantness, particularly at high levels, though there doesn't appear to be useful data on 'safe' levels, just 'advisable' levels (US website are careful to make this distinction, the cynic in me thinks). The concern is that it enters houses through their foundations where it accumulates indoors due to the lack of air movement. This is apparently quite an issue in basements particularly.

So, on the surface at least, for someone wanting to build an essentially underground house this seems quite a worry. But I like to be thorough, so I started thinking about what factors contribute to the information gleaned above, which seems to be widely accepted as fact (at least by organisations trying to sell solutions, and the US government agencies charged with addressing the problem).

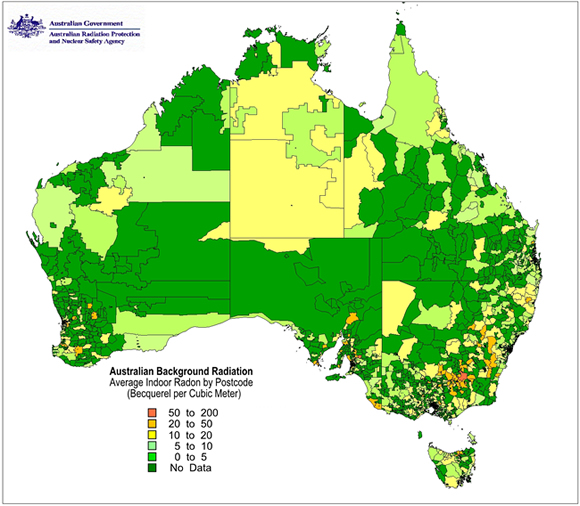
Firstly, it is clear that Radon levels vary from place to place. Much of the initial information I came across was from the US, describing it as unusually high compared to global levels. ARPANSA conducted an Australia-wide survey in the 1990s which seems to indicated Australian levels (¬11 Bq/m-3) are lower than elsewhere (¬40 Bq m-3).

Very comforting.

However, upon closer inspection this refers to the indoor levels only. This is significant because there's a possibility (indeed probability) that the variable causing the difference between areas relates to the type of house rather than any inherent difference in the Earth's crust. In truth, I would assume a bit of both. The plot thickens.

One can assume, for instance, that part of the issue in the US with basements is because they aren't as well ventilated as above-grade spaces, leading to an accumulation of Radon as it off-gasses through the foundation. One might also assume that in deep winter or the extremes of summer people actively seek to limit ventillation in their houses to keep air temperatures consistent and not waste all that energy-hungry air conditioning. It's unclear, though, how much this plays a part in geographical differences regarding Radon accumulation.

I could hypothesise based upon the above map (for example, I notice that the area of high concentration on the NSW/VIC border is an area in which it is both very hot in summer an very cold in winter, perhaps leading to accumulation due to lack of ventilation year round), however I have no way of finding out if this is in fact that case. It also just so happens that that very area of higher concentration is close to where we intend to build, so figuring out if it is an inherent difference in the earth's crust or some function of prevailing building and climate control techniques seems rather important.

As I have no way of knowing this (despite several hours of energetic googling on the subject) I turn instead to methods of limiting Radon accumulation as it seems like perhaps we should consider doing that anyway. Pleasantly, after a bit of searching, I found that the most effective methods are based around aspects of construction we will need to do anyway when building with earthbags. Problem solved!


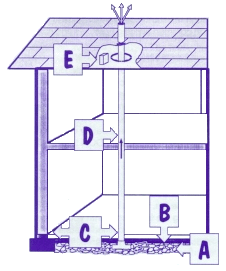
Firstly [A] a permeable space below the floor (eg. gravel, which we have to do anyway for drainage). Secondly [B] a non-permeable layer above A but below the floor (eg. plastic, which is easy to add in during construction). Thirdly [C] sealing all openings in the floor (eg. around pipes, which one would want to do anyway). Next [D] a pipe from below the foundation to above the roof to allow the gas to disperse into the atmosphere rather than indoors (pretty easy to include during construction), and [E] a roughed in electrical box to put a fan in later (seems a little pointless, but I totally get that if you're going to do a thing do it properly).

There don't appear to be any regulations around controlling Radon levels indoors (although I may not be looking for the right thing there). So, given that the risk of Radon accumulation is essentially completely unknown (fancy government survey's not withstanding), but addressing the possible risk is pretty easy if done during construction and almost impossible if attempted later, I figure we might as well add in the pipe.

Sunday, September 14, 2014

Double glazing

It seems a little naf to go to the effort of making a passive solar house and not double glaze the windows. However, earth bag building is an inexact art and double glazed windows of custom sizing are prohibitively expensive. A conundrum.

It's always seemed to me that the challenge of double glazing was in the frame - the rest is just two sheets of normal glass, surely? We could debate the merits of low-E coatings and argon filled cavities for days I'm sure, but the basics is two sheets of glass held a little way apart and sealed well. Glass is easy to get hold of in almost whatever size we want (again, we love the tip shop dearly - people throw away the most amazing things), so then it's just a matter of spacing the glass, sealing it in, and ensuring any moisture trapped in the gap is dealt with.

I found several sites describing various methods of DIY double glazing, from the very simple to the more in-depth. Also, a great how-to.

Optimal distances for double glazing for thermal insulation purposes is somewhere in the region of 10-20mm (sound insulation appears to be different again, opinions vary and I haven't yet delved into actual research articles on the matter). The gap needs to be small enough to prevent convection currents from forming in whatever gas exists in the middle. Any number of spacers from bits of wood to strips of plastic seem to be used for achieving this depending on the frame. I particularly liked this suggestion about how to deal with moisture in the gap - sprinkle a little silica gel in between the glass, and let it absorb the moisture over time. None of this high-tech desiccant stuff!

So two layers of glass is do-able. Do we want the windows to open and close, or be fixed? The answer to this is obvious in a more conventional house where one needs the ventilation. Our house, however, will likely have ventilation tubes running underground to cool the air before it gets to the house itself (the ongoing debate about ventilation tubes vs. wind scoop is ongoing and will be posted later).  Whilst opening windows are pretty there is a whole lot of extra stuff to do with them - more technical to construct, need fly screens, all that sort of thing. It is very tempting to have a screen door that can be left open at need, ventilate via underground tubes, and do away with opening and closing windows all together.

I foresee considerable research going into this decision.