Showing posts with label Water. Show all posts

Tuesday, January 26, 2016

A sink table

So we've been planning the outdoor kitchen for a while, and as part of that we want a barrel oven (eventually) and a place for convenient washing up. Thus, the idea of a sink table was born - a semi-mobile piece of outdoor furniture to make washing up a breeze. At least, more of a breeze than it is now with 5 people stuffed into my parents tiny motor home with one mini-sink.

We bought a sink from the tip ($10) - we wanted one with two sinks and two drainage boards, to make large batches of washing up easy.


With some bits of timber we had already (also from the tip, around $15) Kyle made a frame for the sink to sit in.


You can see the very technical numbering system that kept it all in the right place:


Once we had the frame, and the sink was screwed on (with screws from the tip - $0.50) Kyle started on legs. First he checked that he had them all the right length, so the table would be level and not wobble (apparently harder than it sounds).


Because we want the table to be very sturdy, Kyle did mortice and tenon joints for the cross pieces at the base.


 Once they were attached to the sink frame, he put another bar across the base as well. Notice the cut off corners - to avoid getting hurt by bashing your legs on the corner that would have stuck out.


Slats across the base will give it extra stability, and also provide a nice shelf that we can put some small plastic tubs in. This will be where we store cutlery and crockery between uses.


As a request from me, the ends of the big boards at the front and back of the sink frame were left on, and on one side Kyle added a little basket of slats that we can put bottles of detergent and so on in, and the other end there's extra space for plates to be put. There are also a few pieces of dowel across, as tea towel rails.


The front and back boards were painted, as they're most likely to get water on them. Then the whole thing got 3 or 4 coats of polyurethane.


Finally, the very bottom of the legs were capped with a bit of galvanised steel we had lying around to make them last longer. Kyle did up a template in cardboard first, and you can see that the corners are folded instead of cut so that water can't get in through an open corner.


I think the final thing is quite impressive, especially considering that the only part of it that isn't recycled from rubbish was the paint. Even the screws, nails and brackets were from the tip.


Once we have the outdoor kitchen structure finished this will find a semi-permanent home there, with piping underneath to take draining water away to a grey water mulch pit.

The whole thing cost maybe $30 to build, and perhaps $20 worth of paint to make it last longer (we didn't use a whole tin, which we'd bought for something else originally anyway, so hard to tell exactly how much). It took Kyle around 5 days worth of work to build and paint up, stretched into sessions a few hours long over the course of about a month.

Sunday, September 13, 2015

Grey water plans

Reusing our grey water on the garden is a no brainer in our situation. However, for the purposes of being thorough and establishing what assumptions/constraints lead us to that conclusion let's unpack that a bit. For any new dwelling Council's require details of how 'waste' is to be managed on the property. What they usually mean by this is "pay us several hundred $ to connect to the sewers". Since we have no intention of connecting to sewers (they're miles away for a start, but also we'll have composting toilets so why bother?) we are left with the issue of how to manage greywater. Given the effort we'll go to to catch and store water for drinking, it makes sense to be just as strategic about where it goes to next.

We are aware that by and large most grey water systems do not 'save water' overall. That's ok with us, as our goal for the system is the strategic use of what would otherwise be waste in a situation where we have little alternative. Anywhere we go from just letting our waste water trickle down the hillside is a positive.

So, how? Our requirements for any system are generally that it's cheap, complies with regulations (usually the hard part), and can be made and maintained by us with minimal help.

In our initial meeting with the council it was obvious that their opinion of grey water reuse systems was less than positive. Extremely reluctant, I would say, certainly not enthusiastic. Grey water was the one aspect of this build that has been met with the most reluctance, on every other aspect of our project the people we've spoken to in the Council have been hesitantly open-minded. But with grey water, the boom gates really came down. It wasn't an outright 'no', but they were very clear that we'd have to have our documents very much in order to get this through. It does make us wonder what has happened to make this Council so reluctant to deal with grey water systems. We'll probably never know, but we can hope that we'll be part of turning that attitude around.

Firstly, the regulations. In NSW greywater diversion systems can be installed without needing council approval provided they comply with certain conditions which we won't meet. Local council approval is needed for a diversion system from bathroom/laundry - so far as I can tell the same SepticSafe form we'll need for our composting toilet applies to any proposed waste water system, with the section below listing the expected supporting documentation:


And they say Australia is an over-regulated society...

For kitchen waste water the story is a little different. We'll need a treatment system that is accredited. This was where the plot went from thickening to curdling for me. The Australian Standards make it very clear that local governments are not permitted to approve grey water treatment systems that are not accredited by the Health Department. However, I keep finding accounts of people who have managed to get various systems approved by council even when they aren't accredited, either just by that particular State's department or at all. It does seem, though, that for this first house project a DIY grey water treatment system may be one battle too far.

On my search for an accredited system I had a few requirements. Early searches found many systems with pumps and vent fans and all sorts of other contraptions that required electricity to run, this seemed like a completely unnecessary strain on our electrical system. I also found any number of systems that retailed for upwards of $10,000. Since this is almost half of what we hope our entire house will cost to build it, again, seemed an entirely unnecessary waste. Any system we choose will be simple and cheap. The third requirement is for limited maintenance. The various systems on offer that require a registered plumber to service them every 3 months are, to me, completely foolish and to be avoided at all costs. If we can't maintain it ourselves we're not really interested.

After quite a bit of searching I found a useful table that confirmed a lot of what I'd read already - that two particular models (EcoDesign's Greywater Reuse System, and EcoFlow's Nature Clear GWS10) fit the brief in being on the cheaper side, needing no electricity and limited maintenance, and had the added bonus of producing compost periodically. Seemed perfect, except they're both only accredited in Qld and 'parts of NSW'. We'll try our luck, I think.

One final note: We are aware we are designing a system that will not be able to handle substantial contamination with human waste. We also know we want kids somewhere in our future. This will inevitably lead us to a choice, down the track, about nappies that has a bit more weight to it than the convenience vs environment dichotomy that plagues most of our friends. Though a quick search found these, which would appear to solve the problem.

Saturday, August 22, 2015

Water tank plans

We decided some time ago that it would be a good idea to build water tanks out of earthbags. Plastic or steel are expensive, concrete is just too much work. Plus, it gives us a chance to practice. The plan is to build water tanks over weekends, get water delivered to the site, then we can use that water during the main build (it won't rain enough between then and now).

For houses not connected to mains water the minimum on-site storage capacity that the council will approve in connection with a dwelling is 110,000L (90,000L for domestic use, 20,000L dedicated fire-fighting supply). As in, they will not approve a dwelling that includes a smaller water storage capacity. We asked, but apparently the lower demand for water resulting from use of waterless toilets doesn't count towards the mandatory capacity, so we still need to put in massive tanks. Realistically we know this is only a good thing, and we'd want to do it anyway, it's just a bummer to have to do it now.

First we had to work out how big they should be. It makes logical sense to want smaller tanks instead of one big one. Materials and so on come out a bit more expensive, but it means you can do maintenance on one while still having water storage in the other. I triple-checked with the Council and apparently on land zoned RU1 (which we are) above-ground tanks of any size count as exempt development, meaning you do not need to apply for council approval for them (in most other zones you need approval if it's bigger than 10kL). This stumped me a bit initially, as it didn't make sense that we needed extensive engineering consultations for the house, but the water tank (bigger, heavier, severe consequences if something goes wrong and multiple kL of water go rolling down the hill) is good to go regardless.

So we went through a process of working out whether to worry about that. We are aware of quite a number of 15-20kL tanks made from earthbags in various parts of the world. This proves the concept works, but what about a bigger tank? Will an increase in the diameter of the tank increase the outward pressure of the water on the walls? At first, logically, it seems like it should. More water = more pressure, surely? In a water tank we're primarily concerned with hydrostatic pressure (because the water isn't moving, so the only force we need to worry about is gravity). Pressure is related to the depth of the water, not simply the volume. The parts of the tank wall closer to the bottom will receive more pressure than the parts of the wall closer to the top, but the wall at the same depth doesn't receive different pressure if the volume of water is greater. So if we have a 2m tall tank that is 3m diameter, and a 2m tall tank that is 6m diameter, the pressure on the tank walls is the same even though the volume of water is greater.

Greater water depth = greater pressure, regardless of volume
(this is why people put water tanks on stilts, to get higher water pressure)

The next part to think about is the hoop stress on the walls. Hoop stress is the pressure perpendicular to the axis of a cylinder (so the walls of our tanks), and is related to both the radius and the thickness of the walls. Physics textbooks usually use the example of the pressure on the hoops of a wine barrel (I'm pretty sure that's where hoop stress gets its name). This is where it got hard for us, no one we found had done studies on the maximum hoop stress earthbags walls can withstand. After some very extensive internetting (including some excellent spreadsheets for materials calculation covering all potential water tank materials except earthbags) we realised that this was simply unknowable for us. Someone, someday, might conduct the stress tolerance testing to figure this out, but it won't be us. Given that, it follows logically that the safest approach is to ensure we use the widest possible bags (as hoop stress is related to both radius and thickness of the walls - to be safe within the unknown, maximise wall thickness).

Finally we wanted to thought experiment with what would happen if we were wrong and it all fell apart. There is potential for cracks to form in the tank wall over time, which would be a problem if we were sealing it with concrete and painted sealant. So we're going down the path of a tank liner instead. We think it is a reasonable assumption, though, that if the tank walls did start to fail this would be a very slow process over time and we would be able to monitor it as the tanks age. It seems likely that points where pipes fit into the walls of the tank are the weak points, rather than the structure of the wall itself, and any failure is likely to come from the fittings first. If we do notice the wall beginning to bulge outwards with time we can look into ratchets and strapping and see how we go, but again this is likely to be a process taking years rather than giving way overnight. As a bit of additional structural support, during construction we will use a trick I've seen in a few accounts of earthbag building, particularly in earthquake zones, where metre-long lengths of rebar are hammered down through the wall at regular intervals.

So, we have a bit of leeway with tank size from a structural perspective. Therefore, it comes down to convenience and cost. Given we need 90kL drinking water all up, we end up with the option of 2x 45kL tank or 3x30kL tanks. We also need at least a 20kL tank for fire-fighting water.

Kyle, who by virtue of having a more happy-go-lucky approach to life than ever-practical me, is in charge of ensuring we don't go too fast with this whole project and forget to have fun. In an effort to make his contribution to the water tanks he's suggested we should put crenelations on top and paint the sides to look like stonework. He reasons that since we have to have a bunch of big, round, tower-like structures anyway we might as well make them look cool. We met at the local historical re-enactment society, so this isn't an entirely left-of-field suggestion.


With this in mind, plus practical considerations such as the time it takes to build each tank, we think we'll go with a total of 4x 30kL tanks. My rough maths (aided greatly by Google's cylinder calculator - just google 'volume of a cylinder') tells me that a tank that is 2m tall will need an internal diameter of 4.4m to hold 30kL. Note that the height here is not the total height of the tank but the height to the overflow, as the roof (and any crenelations, if Kyle convinces me this is a good idea) will be a little higher by necessity.

Overall, dealing with the water tanks first is a good move. It will allow us to try out the whole earthbag concept in terms of materials calculations and get the hang of how it will work on site with groups of people doing stuff before we get to the complicated part (cylinders are pretty straight forward). That way, when we get to the house, we're familiar with the process. At least, that's the theory - we'll see over the next few months how that turns out in practice.

My budget hesitantly puts material costs for the build of each tank at around $1500 (including earthbags, tank liner, and fittings), but I'll go into further detail on that once it's a more precise estimate. I suspect our strategy will be to build one or two, then build the house, then do the rest at the ever indefinite 'later'.

Sunday, March 8, 2015

Rainfall

There are some inherent difficulties in how we've chosen to plan and build our house. A lot of the planning stage is taking place before we've actually bought land, meaning that we can't get truly accurate data on the specific climate of wherever our little patch of paradise will end up being. Makes planning for all manner of things a little difficult. But we have a rough estimate of where we'd like to be, and are reasonably confident that's the region we'll end up in, so I can proceed from there.

One of the most important things we need to plan for is water. This is the aspect of the build that most concerns me. Maybe that's surprising - I'm entirely confident we can build the structure of the house, and we've more or less decided gas for water heating and cooking is probably the easiest, and whilst I don't currently know terribly much about electronics and solar panels I'm sure I can learn. However, the rain does worry me as there's no manner of learning more about it that will make it rain more, and we are unlikely to have a mains water connection as a backup.

So off I go to the Bureau of Meteorology site to look for historic rainfall data. As you do!


For a rough first estimate the areas we're looking at properties fall solidly on the 1000-1500mm borderline. But I'm particularly interested in seasonal variation - winter is the wet season in this part of the world, which leads to a long dry summer. Into the future I can't imagine this will improve considerably.

Through my subsequent search I found the most amazing tool - Tankulator. You can enter in your likely postcode, find the nearest weather station, enter values for the size of the collection area, how much water you use (we'll have a composting toilet and recycle our grey water for use on the garden), the size of your tank, and it will draw you a graph of the predicted tank water level over 5 years. You can then make adjustments and go back and forth until you find the most stable configuration.


The Tankulator lets you select whether you'll start from an empty tank, or fill it initially to either 50% capacity or full, which we'll probably end up doing. I've struggled to find price estimates for water cartage, but there are several companies that offer this service in the area we are looking so this will likely be our safety net if we get our maths wrong.

It makes sense that a larger collection area will be better, and a larger tank capacity also. As we'll be completely off grid for water it's important that even during the driest years the tank is unlikely to empty entirely. I would also tend to see tank overflow as a failure - all that water that could have been captured and stored, if only the tank was bigger. Ideally I'd like the water level to hover between half and three quarters full, so I had to do a bit of fiddling around with my (entirely imaginary at this point) consumption, collection area, and tank size numbers.

The process of successively changing these numbers and seeing the effect they had on the amount of water stored (and whether it was trending up or down) was quite enlightening. It also highlighted the importance of the exact location in determining what size tank to get - the weather station shown above leads to a fairly stable water level, but the next one over trended way down over time with the same numbers.

Wednesday, October 1, 2014

Compost water heating

I've seen a few compost water heaters now, on my search for hot water systems. I was far from convinced that they were for us, however. Most seemed either a lot of work to maintain, or don't last very long. The geek in me still likes the idea, though - somehow it seems a little like hacking nature.

So I started thinking - maybe a compost heap water heater won't work for us for the main house. But before the house is up we'll be on site for a period of a month or two at least, essentially camping. Whilst Kyle and I are no strangers to camping, we're not against doing so with some added comforts. It also occurs to us that we'll be more able to conscript convince our friends and relatives to help if we have ammenities available.

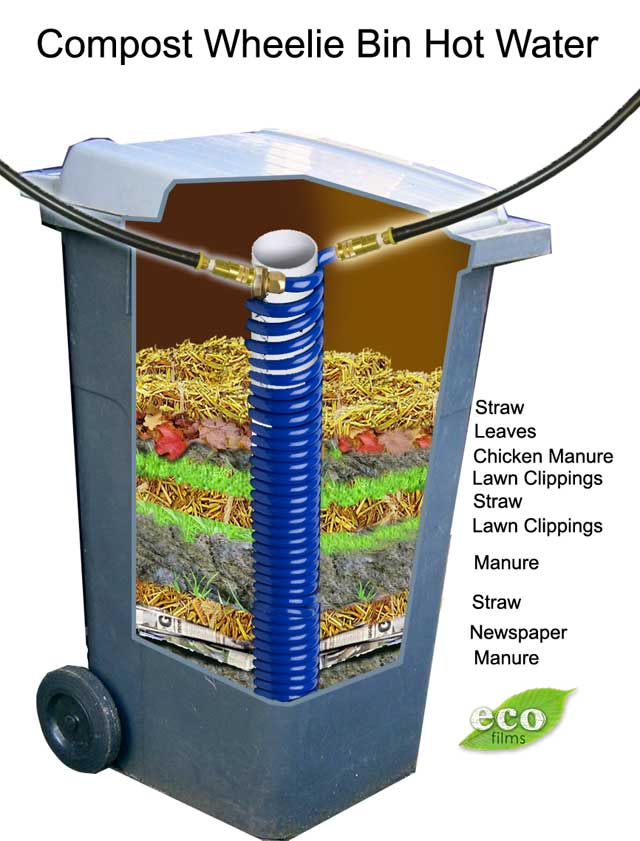
To that end, I quite like the Compost Wheelie Bin Hot Water System (there are any number of other sites showing a similar design - I couldn't quite be bothered to track down who did it first, I just gave up once I'd found a site that quoted measurements).


It works pretty much like the name suggests - you stick green stuff in a wheelie bin, with a water coil down the centre. Several sites I found suggested it would last comfortably for about 4 weeks, though they also said it takes about a week to peak and suggested starting another one two weeks in to tag team them. Two of these, swapped in and out, could do quite comfortably during the build for our little house, and let me have my experiment.

For a more long-term solution I quite like the Pain Mound, and this is where I could see compost-powered water heating working for Kyle and I.


I first found this one through an instructable, and later tracked down the original book on the matter (long out of print but available as pdf). The bits that really caught my attention were that Pain's goal wasn't just convenient cheap energy, but fire risk reduction in the forests near his farm (an ever-present risk in rural Australia). A bit more hunting around and I found someone else had taken on the water heater idea and very recently produced another book on the matter, which I'm about to order a copy of.

It might take me a bit of work to convince Kyle (or even just myself) that compost-powered hot water is a good move though. The particular lifestyle we're looking for does not involve isolating ourselves from the world entirely and digging in off-grid. We'll still have our day jobs, we just aim to be less dependent upon them. Whilst education is a fairly safe industry to work in most of the time, in that the job itself isn't going anywhere, the idea of being able to retire at 35 if the work dries up (or if the mood takes us) is an attractive one. Not that we'd have to, we just could if we wanted to - the idea is to have choices, open up options, rather than lock ourselves into the traditional game of life.

Thursday, September 4, 2014

Hot Water

In considering options for a hot water system for our house I began with quite a few assumptions, some of which have proved false, a few wants, and just a few needs that could not be compromised. There seemed to be the following general options:

System Pro’s Con’s
Electric storage tank
  • Cheap upfront
  • Many models
  • Common (maintenance familiar to tradesmen)
  • energetically expensive to run
  • takes up a lot of space
Gas storage tank
  • Cheap upfront
  • Many models
  • Common (maintenance familiar to tradesmen)
  • less energy than electric storage tank
  • takes up lots of space
  • energetically expensive
Electric on-demand
  • takes up less space than storage tanks
  • more energetically expensive than gas on demand
  • can end up more energetically expensive than electric storage tank, depending on use
Gas on-demand
  • takes up less space than storage tanks
  • ... requires gas? 
Heat pump
  • less energetically expensive than regular electric elements
  • still requires electricity
  • loud during operation 
Solar
  • no additional energy source required
  • requires secondary booster system to maintain stable temperature 

For the same reason as others before us Kyle and I rapidly came to the conclusion that the type of water heater we have in our current house (traditional electric element with storage tank) will not work in the intended ones, either the 'prototype' or the bigger house. I did a little bit of reading of some very boring comparison tables to confirm this assumption before quite happily discarding them altogether as an option.

We are very reluctant to chose any system relying on electricity, as this places greater pressure on solar panels which are expensive. It seems wise to follow a policy of minimising use of electricity altogether as part of our intended way of living. Thus, electrical on-demand systems and heat pumps will probably not be the eventual choice.

On a side note, an ex-geologist friend of mine presented a great argument a year or so ago about why he thought our area would find itself in the next 5 years rapidly short on fuel for gas appliances as nearby sources were exhausted. Whilst I didn't really follow the specifics of his claim at the time, and haven't (yet) looked into it in detail myself since, the discussion lingers in the back of my mind as I generally trust his opinion. Thus I would be reluctant to commit irreversibly to gas alone for water.

Solar collectors with 'boosting' from gas or electricity are becoming more common. After considerable reading I found several anecdotal accounts (1, 2, 3) of individuals who used unboosted solar collectors with satisfactory results, mostly in low use households. As we want to limit our external energy needs this would be ideal, and my (by no means expert) understanding of physics leads me to thinking that with a very large, well insulated storage tank you could achieve relatively stable temperatures.

However, Kyle has a quirky medical condition that means he doesn't feel pain and struggles to identify extremes of temperature (sounds weird, I know). Whilst I don't particularly mind the slight variation in temperature expected from solar collectors, this is a very real safety concern for Kyle who can't tell the difference between 'hot' and 'too hot' but will still burn if he turns it up further. Current strategies for avoiding daily injury depend on Kyle being able to memorise how far to turn the taps on - variable temperatures from the hot water system would make this unreliable.

Initially Kyle and I both assumed that this would rule out stand alone solar systems entirely, however I was reluctant to abandon them. My thinking ran along the lines that the risk isn't the days when the temperature is lower than 50°, it's on the days that the temperature is high enough to scald. In a traditional system this would be controlled by a valve that mixes the hot water with cold water as it exits the tank, and you can turn it up and down with a spanner. We already knew enough about these manually controlled valves to know our current home doesn't have one, hence why Kyle risks scalding daily.

A bit of digging, and I found variable valves which will result in a water mixture of consistent temperature regardless of the inputs. One of those "I can't believe we'd never heard of this before" moments. I have slight concerns that all models I found seek to provide temperature stability in both directions, whereas we're really just concerned with keeping it below a certain point and don't mind if it falls a little further, but this is a start!

So at this stage we're keen to explore un-boosted solar further, but may end up with a gas on demand system. A little more research yet.

Monday, August 18, 2014

Planning Water Tanks

At this stage of planning Kyle and I haven't yet found a site, however we've had enough of a look around to be fairly sure getting one with a mains water connection is unlikely. Our goal would be to live without it anyway, but it would make the building process easier. Anticipating this challenge, it seems fairly likely that one of the very first things we'll need to do is put in a water tank (a dam, if possible, would come later).


Following our wish to buy as little new as possible we quickly abandoned any intention to buy pre-made plastic models (also, ridiculously expensive). I found any number of how-to guides written by people based in the US who'd done various versions out of concrete and other materials. Aware as we are of the excess of regulations that might surround building anything in this country, I began investigating.

Ignoring regulations (which seems to happen occasionally in water tanks overseas) is not an option as we won't be able to ignore them for the entire build of the house (people might notice we're building a house) and we won't risk getting any authorities offside in what is bound to be an extended relationship with them. We also recognise that in the case of a tank intended for drinking water many of the regulations are for our own safety. So, with this in mind, I found a very helpful document from the health department detailing just about everything I could want to know! I'll need to do some more investigating down the track to ensure there aren't any special requirements in the location we end up, but it does seem like a DIY job will work just fine.